The Boogie Mechanic's Handbook
-tips on using the
Skydance Technique
The Skydance approach to Boogie Mechanics means that
you view skydiving as a doorway into human experience. And organizing dives
means building Human Radios trying to tune into that cosmic dance wavelength.
You create dive patterns by combining basic moves the swoop, the hop, the zoom,
the lurk, the mesh, the weave... to suit the situation purpose mood of the
moment. And you deal with wide ranges of experience by varying the choice of
moves from slot to slot.
Including students with nonessential slots. Look
at our dirt dives with a whuffo's wide eyes.
And realize with finality
that
a plan
is just a tangent vector on the manifold of reality.
How ... ?
You
can't just say
"Let it be done."
You have to think
What it
really is.
What it really is
is a state of mind
And the question now
is
How... ?
How do you create the consciousness for the Skydance dives?
Put
your good where it will do the most?
Lead. Without leading?
-Skratch Garrison
Steps to follow in learning sequential RW. While sequential maneuvers and large formations are unlimited in size and shape, they are related in the way they are put together. Here are some general steps and ideas that we have found helpful.
First, decide what maneuver to do. It helps to have a notebook with some ideas drawn out. Pick a maneuver that matches the ability of the people on the load.
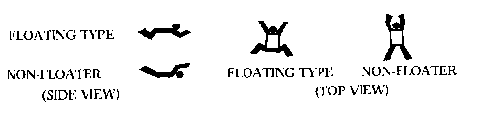
The next step is to determine positions. There are usually three types of positions - basemen, middlemen, and floaters. The base must be built quickly and smoothly. If some of the more experienced people can be used to build a fast solid base, it will be easy for the middlemen to fly into position. While some flyer positions require the more experienced people, most positions need people who can fall slow.
Design an exit to best fit the jump. The sooner you can get everybody hooked up, the more maneuvers you can do on the way down. The exit should be as efficient as possible - as fast as possible. You can hang two and usually three people outside almost any airplane.
Gear up and walk through the jump on the ground from exit to breakoff at least two or three times. Make sure everybody knows exactly where to go and what to do. Practice an exit on the airplane before take-off. Make sure people can hang outside long enough to let the people just inside the door get stacked. With an efficient launch, the first six to eight people should leave the airplane in one lump.
It is handy to have a sketch of the maneuver that people can study during the climb to altitude.
Exit as fast and close as possible. The base must fall as fast as necessary to keep the maneuver from over-floating. Sometimes it is good to have the four or five base people wear fast-falling jumpsuits. As the maneuver builds, the people inside must absorb and dampen impact from bad approaches.
All docking should be done so that no momentum is transmitted into the formation. Occasionally a momentum approach is necessary to connect a section which is too wide to reach. During and after docking, do not add float to the maneuver. Fly with the base and tuck as necessary. Maneuvers fall slower as more people get on. Later approaches should be made from a slightly steeper angle. Anticipate how it will float and let it come up to you.
As soon as practical after landing, regroup and walk through the jump as it happened. Analyze and correct any mistakes.
Ken Gorman, Spotter, May-June 1975
Some mental attitudes and ideas helpful in sequential. Good sequential relative work requires the individual flyers involved to look at their roles a little differently than in round-star relative work. Basic to sequential relative work is the Zero Momentum entry. Don't use the formation to absorb any of your approach momentum. Fly into position and take that little extra time to "finger-tip it." Burning the man in front of you is meaningless in sequential relative work. Sequences build in order; if you burn the man in front of you, you probably won't have a slot when you get there.
Flyers must work as a group. The bases of most complete sequences take long enough to build that everyone is there by the time it is ready. Show discipline - set up in an orderly pattern around the base. Don't get tunnel vision - look around at the other flyers, watch the formation building as a whole, not just your slot. Try to mesh your approach with the flow of the dive. Try not to cut in front of other people to improve your position or make your approach easier. Work as a group - leave your personal ego trip on the ground.
Formations have been known to slide and float, especially when they're in trouble, so don't set up too close-cut yourself a little slack - but be there on time when your slot appears. There are no rules to sequential relative work. Do it with any number you like, out of any aircraft; use any technique you want to build anything you like. We are free to relate to each other in any way we choose.
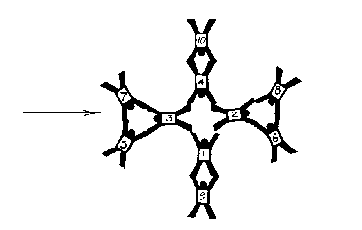
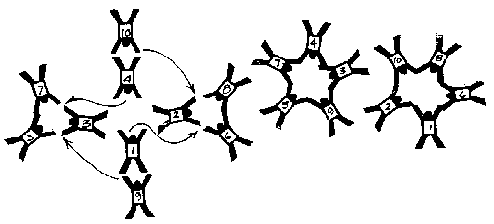
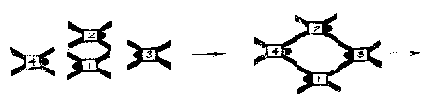
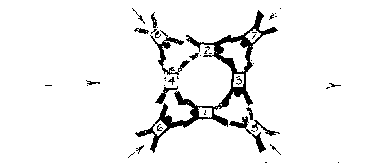
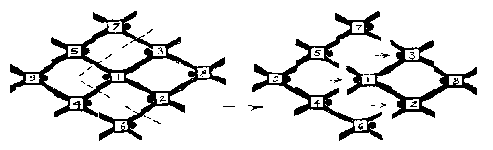
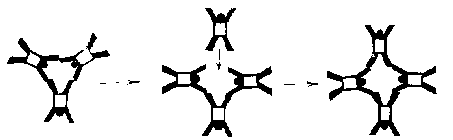
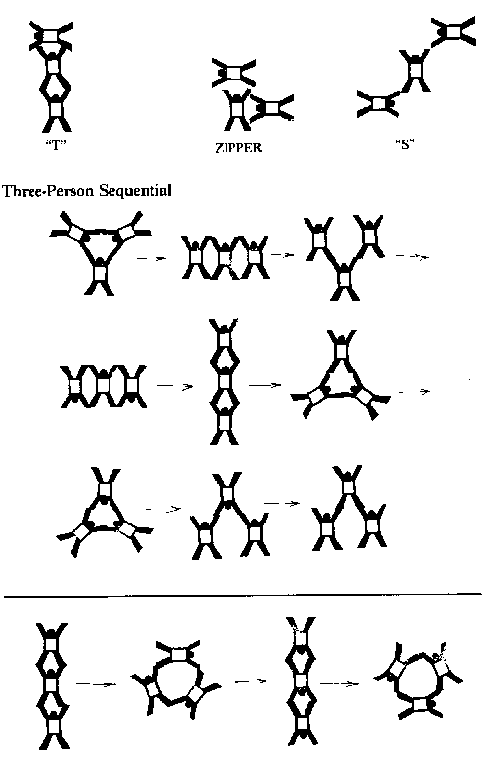
General information on sequential relative work. Sequential Relative Work requires skills and techniques not used in star work. It also requires a basic understanding of certain formations and maneuvers and how they relate to each other. Like all relative work, sequential dives start with a hook-up. There are five possible hook-ups:

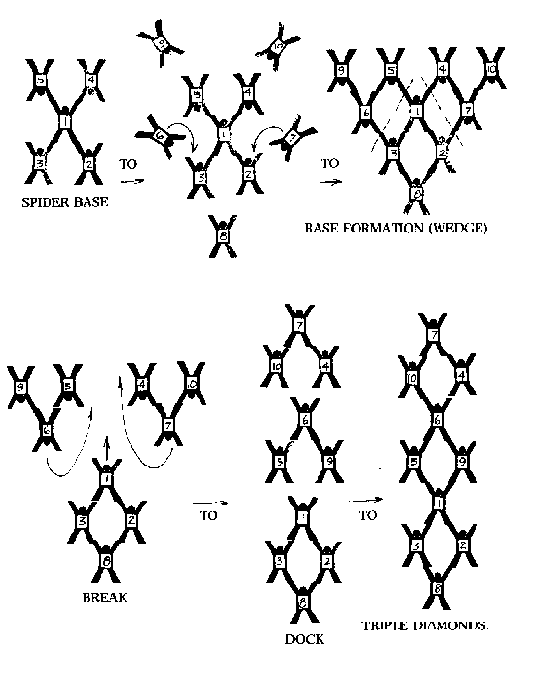
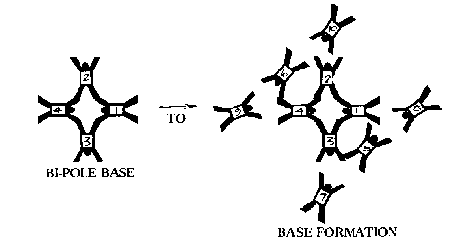
The bases for various sequential formations are built from these. Here are some possible base units using these hook-ups:
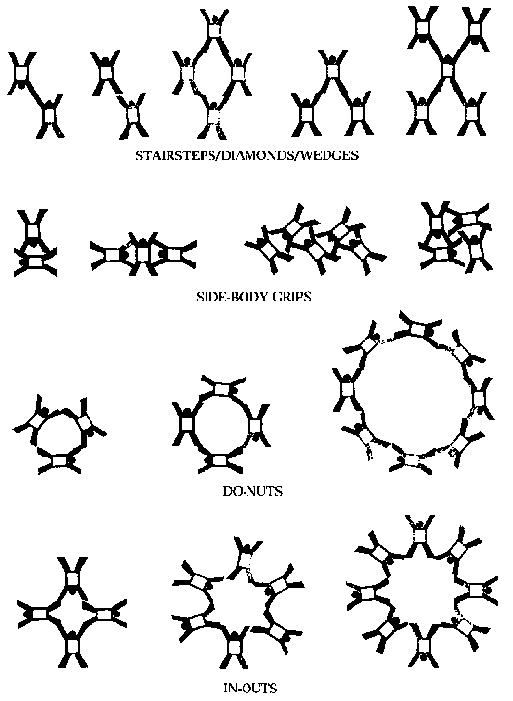
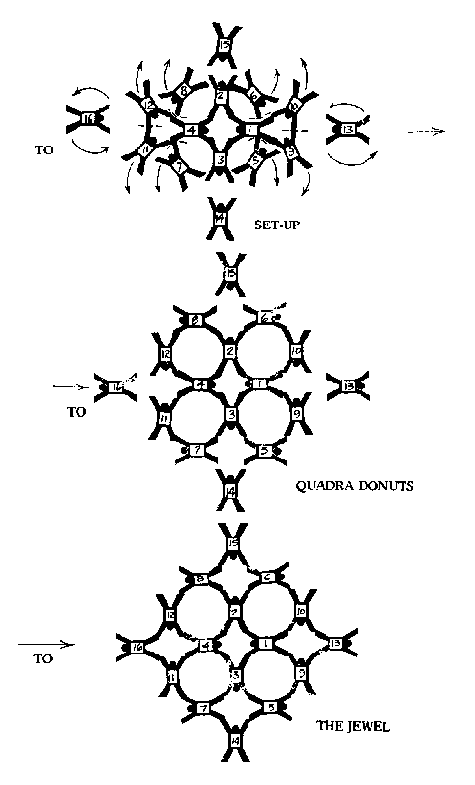
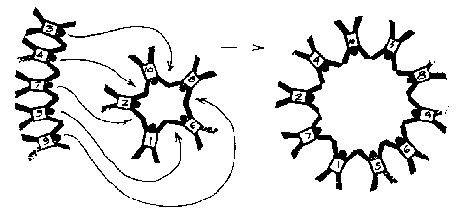
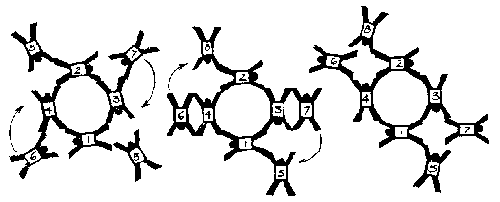
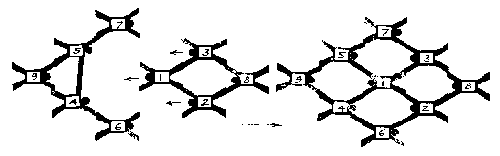
These base units, or combinations of them, make up all sequential dives. The ability to perform fast, stable, reliable bases is, of course, the first prerequisite to becoming a viable sequential group. A group beginning sequential relative work will usually build its first formations by repeating the same base unit in some logical pattern. Examples are:

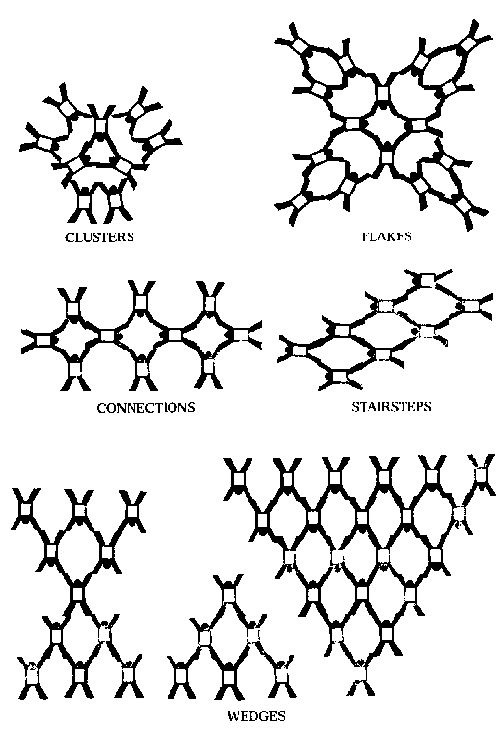
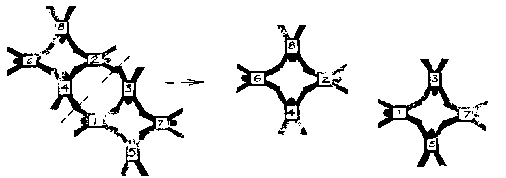
This type of formation can be made as large or small as desired. These are static formations, and require techniques and organization similar to stars. Once learned, they can serve as the base formations for the group's first dives that sequence. Such dives sequence by simple grip changes or partial break and secondary approaches. Here are some examples:
TRI-PODS TO 9-CLUSTER WITH A 3-WEDGE TRACK AWAY:
TRIPLE DIAMONDS TO A 10-WEDGE:
16-CLUSTER FLAKE TO QUADRA-DIAMONDS:
As a group moves from building static geometric formations to sequential routines, they must learn new skills and techniques. This can be a difficult time for experienced relative workers. Sophisticated sequences can easily turn to chaos. Sequences must progress smoothly with everyone doing his part or they cannot build at all. Formations are not always symmetrical while building, as stars are, and will spin more easily. It is frustrating to spend a whole dive watching the base funnel, or being in that spinning, funneling base, or not being able to complete a routine after many tries. But remember, learning to fly has never been easy. If you've been having an easy time flying, you haven't been learning. Sequential demands total group effort. The group must function as a unit within the framework of the sequence.
A group that is serious about learning sequential relative work must be able to build base units fast enough and reliably enough to make them viable initial maneuvers or bases for larger formations. They must acquire basic sequential techniques such as: grip changes, folding, fold-outs, odd-flying positions in formations, stability in transitions, the ability to remember a pre-arranged sequence, key breaks and transitions, and flying hooked-up with others.
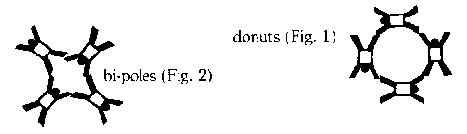
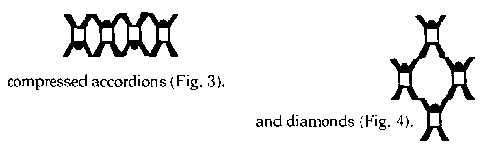
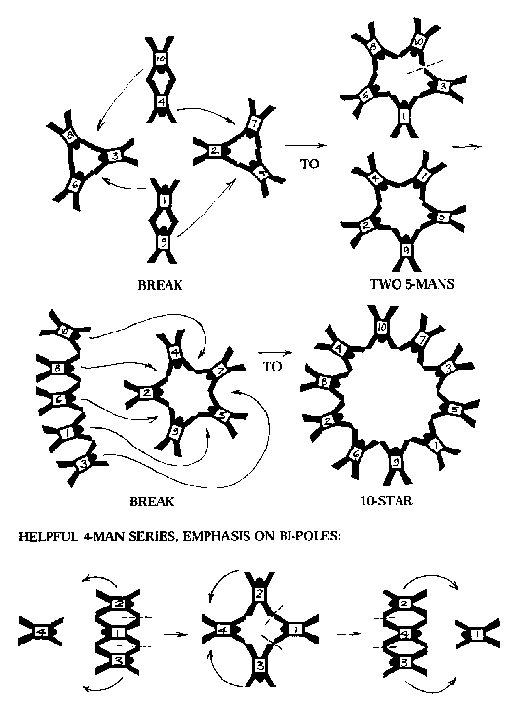
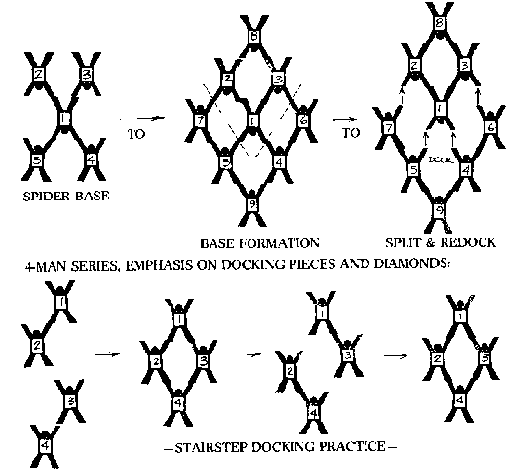
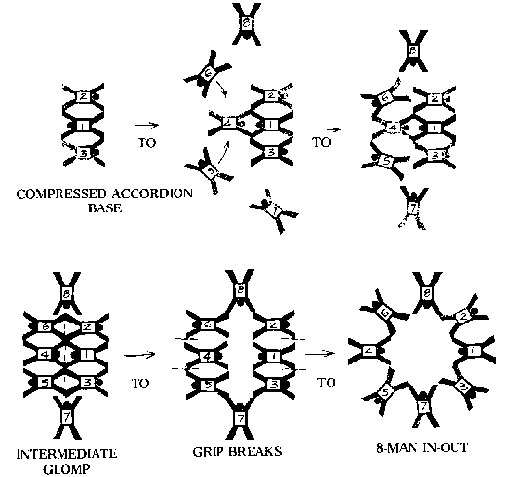
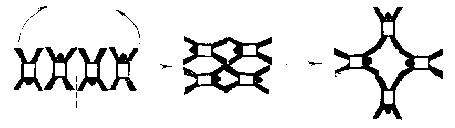
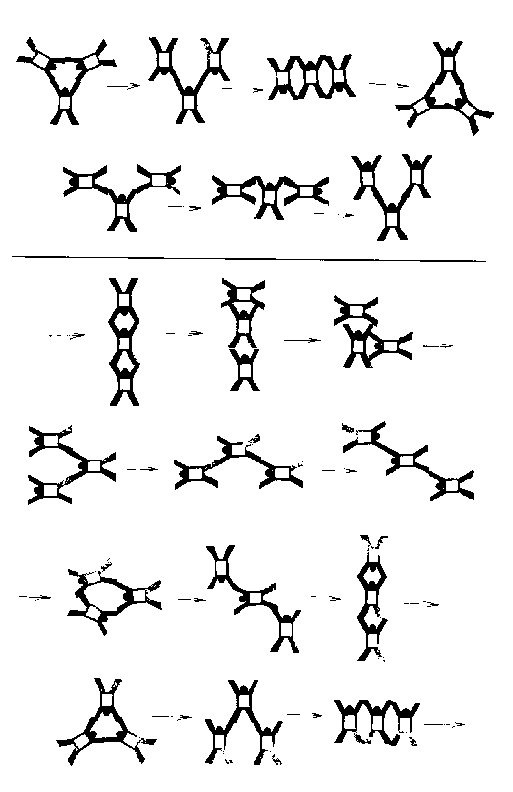
Four-man sequences. As the group progresses to sequences that require bases such as bi-poles, accordions, donuts, or in-outs, and use complex keys and grip changes, it becomes necessary to work in smaller groups. It is not profitable for eight people to hang around for 40 seconds while four people fail to build a stable donut, or for sixteen people to fail over and over again to build a formation because of mental errors during changes or miscommunication in the keys. Working in groups of four is the most effective way to acquire the skills necessary for larger, more complex sequences.
The best way to use the advantages of small group relative work to learn sequential skills is to string together a fast-moving series of four-man bases. This way the group not only experiences building -Ind flying each of the bases, but also learns transition skills, keys, timing, smoothness, and awareness of flying hooked-up with others.
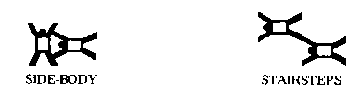
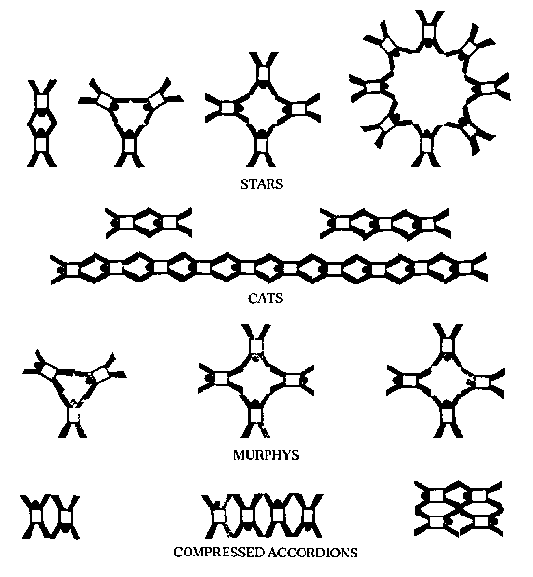
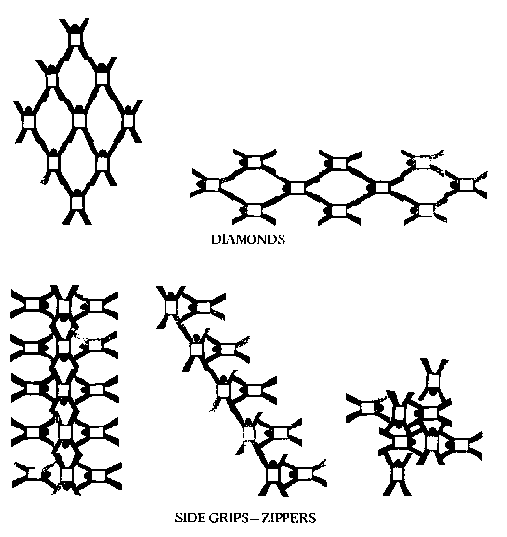
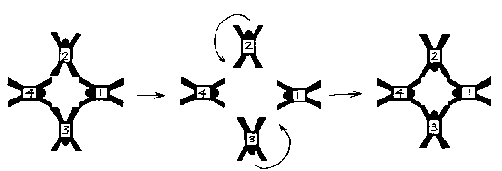
The bases most used in complex sequences are
There are relationships between these bases that make a fast-moving sequence possible. The series may be varied to emphasize certain bases or grip changes or positions or transitions. It can be made to repeat or change from base to base. Here are some possible series:
1. Full Sequence -
2. Bi-Pole Compressed Accordian Series:
3. Stairstep Docking Practice:

The particular order and parts of a four-man sequence are determined by what bases and skills the group needs to practice for more sophisticated routines. The four-man sequence is not an end, it is a means. Learn the relationships between the bases, know the transitions and make up your own sequence tailored to the needs of your group.
Repetitive four-man sequences are not a necessary prerequisite to every larger routine, but they are an excellent way for a group to quickly learn new skills and techniques. Here are some examples of larger sequences and four-man series that relate to the skills necessary to achieve them. Look at the transitions and watch the way various stages of the sequences relate. (Detailed explanation separate)
1. Dare To Be Great: (10-man)
2. Donut Flake To Double Bi-Poler (8-man):
3. Diamond Dock (9-man):
4. Triple Diamonds To Double Diamond Dock (10-man):
4-MAN SERIES - STAIRSTEP DOCKING PRACTICE
Here are some more sequences-watch the progression of four-man skills as they build.
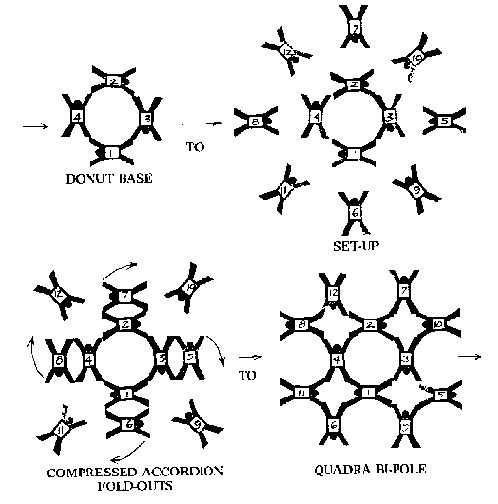
5. Quadra-Bi-Poles (12-man):
6. The Jewel (16-man):
7. 10-Wedge To triple Diamonds (10-man):
8. In-Out (8-man):
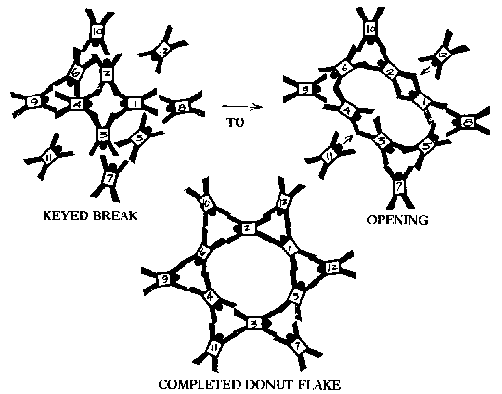
9. Six-Point Donut Flake (12-man):
These are not just possible arrangements of stick-men, they are representations of sequential routines that have already been completed. They are drawn here to show how basic sequential techniques can be used to accomplish sophisticated routines. Study these sequences to gain an understanding of how the dive builds from the base, and what changes and relationships are used to move from stage to stage. Walking through routines, as a group, on the ground is the best way to learn the sequence. This cannot be over-emphasized; it lends to understanding of routines that seem confusing in pictures and words.
Keyed Breaks and Transitions An important part of sequential relative work is the coordination of formation changes and the timing of breaks and transitions. There are three major ways to key sequences: 1. SHAKES, 2. HEAD NODS, and 3. ACTION KEY (when you see something happen.)
Each has disadvantages. Shakes take time to pass through a formation. They can be mistaken for someone repositioning a grip or a rough entry. Nods work only when people can face each other and work best with the fewest people at the shortest distance. Action Keys have a built-in perception-reaction time lag and cannot be used to key changes that must happen in different places at the same time.
All keys require awareness. Everyone must fully understand the sequence, be aware of when changes should happen, and know where to direct his attention.
Deciding how to key the sequence is a large part of the organizer's job. Ask yourself what is trying to be communicated? (i.e., I'm in, the formation is complete, change grips, foldout, break, etc.) Who has the information? Who needs to know it? By what means (shakes, nods, action) can it be sent? Again, walking through a sequence on the ground will make it easier to see the keys necessary.
Look at some of the complete explanations of the four-man series and follow the keys through them. Look at the complete explanations of the larger docking dives and see how the breaks are keyed. Keep the keys to any sequence as simple as possible.
Explanations For The Illustrated Sequential Dives.
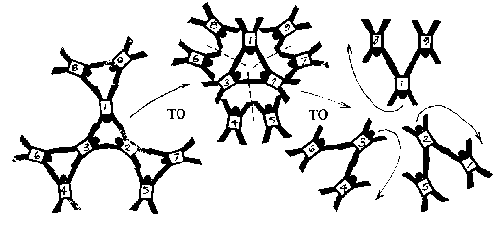
1. Dare To Be Great (10-man)
1, 2, 3 build a three-man compressed accordion:
4 flys into position in front of 1. I shakes 2 and 3, who fold out 90'
4 then closes the bi-pole. 5 and 6 pin the poles (people facing out):

7 and 8 break on them to make three-man pods
9 and 10 enter on the legs of 1 and 4 to complete the base formation:
9 and 10 shake 1 and 4 as soon as they are in and see that the pods are built. 1 and 4 know the base formation is complete when they feel the shake. They look at each other and nod. If both are nodding, they shake 2 and 3 to let them know that the formation is breaking, then they release their grips. The formation breaks to two 3-man stars and two cats:
9 and 10 hold the cats momentarily as the formation breaks, then give a quick shake and release their grips. The point men (1 and 4) turn right, the tail men (9 and 10) turn left, and fly into the three-mans to make two five-man stars:
One of the five-mans has been pre-designated base. The other star breaks to a line facing the base, then breaks up and flies to the base to build a ten-star:
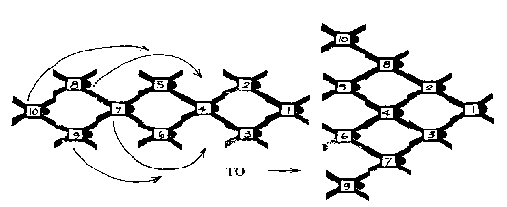
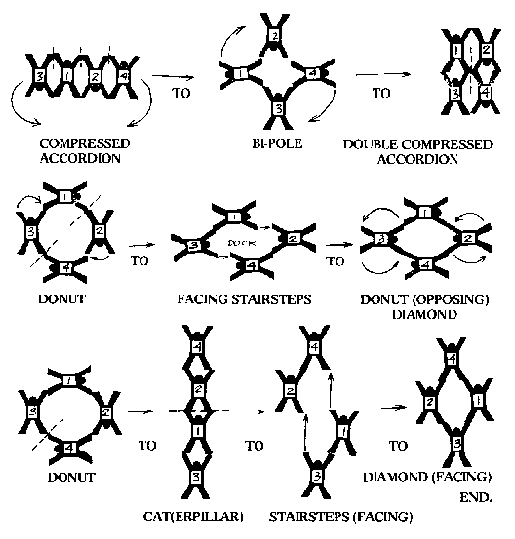
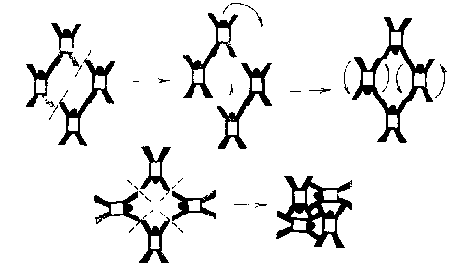
2. Donut Flake to Double Bi-Poles (8-man):
The donut base is built from a compressed accordion pin. 3 and 4 enter in front and back of the accordion to make a donut (opposed) diamond:
They turn the donut diamond into a donut by turning left as they place their right-hand man's hand on their right knee, then releasing the right hand grip and replacing their left hand grip with their right hand (donutize):
5 through 8 fly in and take a hand and a leg in each of the open donut slots. Donut - flake slots are assigned by designating who, in the donut, the flaker will be facing:
1 and 2 will control the key to the transition. When the flakers on the legs of 1 and 2 come in (5 and 8) they (5 and 8) give 1 and 2 a shake. As soon as they feel the shake and the flakes facing them are in, 1 and 2 look across the center of the donut at each other. When both are looking in, they nod, then 2 shakes 3 and 1 shakes 4. 3 and 4 nod to their flakes, who release their right grip. 1 and 2 nod to their flakes as soon as they have shaken 3 and 4. Their flakes release their right grips and fold left to make compressed accordions with 3 and 4. When 3 and 4 have caught the folders' legs, they give a shake and the folders continue their rotation to fold out 90':
5 and 8 then swing and pick up the grips to complete the transition to the double bipole:
5 and 8 shake 1 and 2 when the transition is complete. 1 and 2 look inside at each other, nod, and release their grips. The formation breaks to two bipoles
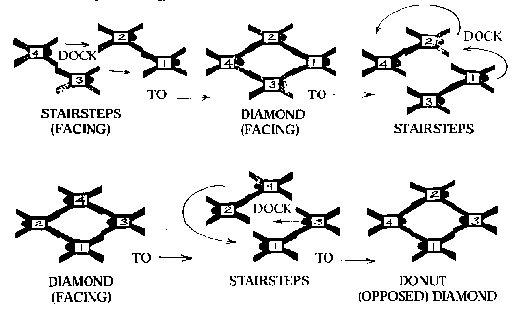
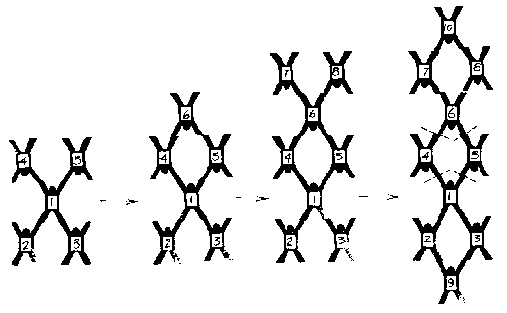
3. Diamond Dock (9-man):
A spider base is built by 1 through 5. 6 and 7 do side approaches to fill the slots between 2 and 4, and 3 and 5. 4 and 5 catch the legs of the respective man as he comes into the slot. 8 and 9 close the ends to form the diamond:
To back the four-man diamond out - 8 shakes 2 and 3, who relay it to 1, so he will know that the diamond is complete. 1 then nods to 4 and 5, who shake 6 and 7. 6 and 7 release their grips as soon as they feel the shake. I waits momentarily so 6 and 7 will have time to react, then releases his grips and the four-man diamond backs out of the Vee:
Air turbulence between the Vee and the four-man diamond pushes the diamond out - there is no need to shove off. Stop the diamond at about 20 feet out and re-dock it with the Vee to reform the nine-diamond. (When the four-diamond has first backed out, 4 and 5 can grab a grip to help stabilize the Vee and keep it from separating laterally):
When the routine is working well, try doing a 360deg. turn with the four-diamond before re-docking, or build the 9-diamond with everyone facing the same way, then fly the 4-diamond out the front, do a 180deg. turn, and redock (note, when flying the small diamond, etc. the members should fly with each other, but do not counteract the movements of the others, flying it just as you would if you were by yourself.)
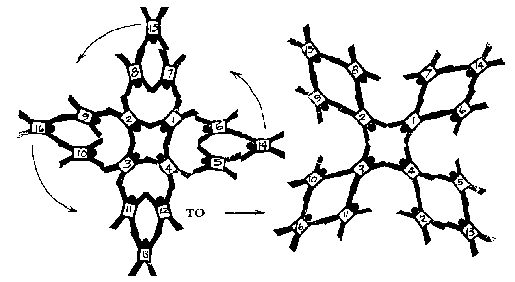
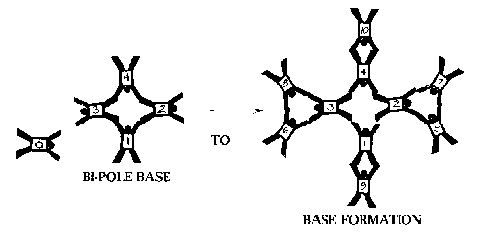
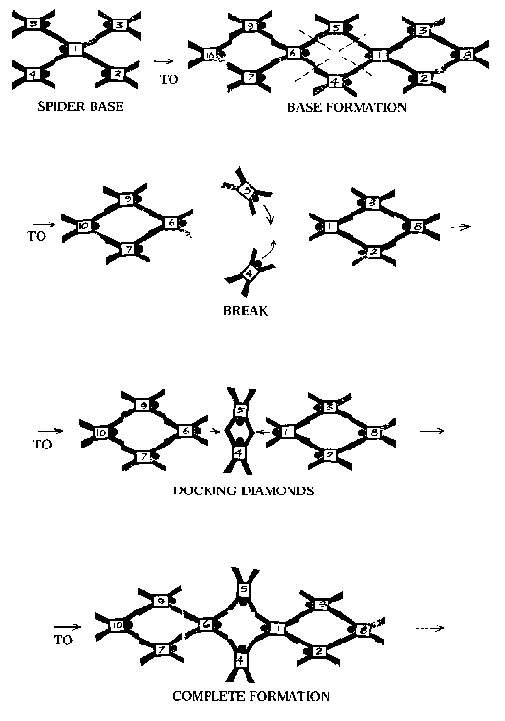
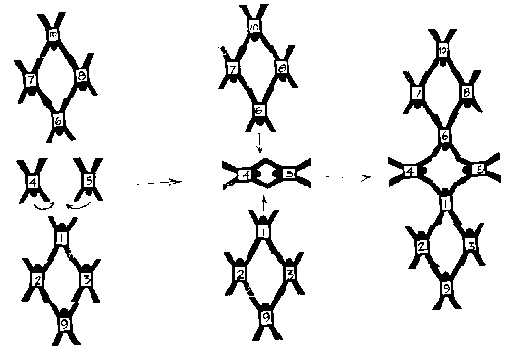
4. Triple Diamonds To a Double-Diamond Dock (10-man):
1 through 5 build a spider base. 6 fills the slot between 4 and 5. 7 and 8 take diamond wing slots on 6. 9 closes the back slot on 2 and 3. 10 closes the front between 7 and 8 to build the triple diamonds. 6 and I will control the break:
9 and 10 shake the formation-complete signal up to 1 and 6. 1 and 6 nod at each other and release their grips. The formation breaks to two four-man (facing) diamonds with 4 and 5 between them. 4 and 5 turn toward each other and hook up for a two-man base. The two diamonds dock on the base to complete the series:
5. Quadra BiPoles
Donut base is built from a donut (opposed) diamond by 1 thru 4. 5 through 8 make compressed accordions with pre-assigned people in the donut. 9 thru 12 set up on pre-designated flake slots. As 1 through 4 see the flakes come into position, they shake each of the people holding compressed accordions who release their grips and fold out 90deg.. 9 through 12 enter as they fold into position to complete the formation:
-Matt Farmer, Spotter, May-June 1975
Tempting our Imaginations: Making the Dives. For those divers with little experience in sequential relative work, and who are interested in pursuing it, the following has been designed as a familiarization of different methods which have been used to accomplish these and other skydives. A lot of what is printed here may easily be outdated by the time it is read, so a combination of these described methods, plus practice and more imagination will be necessary to establish a good base to work from.
The practice of putting the turkeys in the front of the load and the hot shots all going last will not work!
Being able to give and receive constructive criticism is an absolute necessity. As the ego is trimmed down, flying abilities improve respectively.
Keeping relaxed in freefall is a must. Not too loose, of course, just be relaxed.
The true secret of success if to fly to the place in the sky where your designated slot is and dock accordingly. Anyone can do this. It just takes the self-confidence, and not over-confidence, to believe you can do whatever you want to in freefall.
Grip switching and other intermediate steps which are often used to build the desired formations put undue stress and tension on the formation, causing it to warp and distort or even crumble.
Working with a group of four divers who all fall at the same relative speed produces the greatest learning process with the least hassles. A jump altitude of 10 grand or so is more than worth the added expense. Much more can be accomplished once everyone is working together. A 60-second delay is worth the experience learned in three 30-second delays, with the convenience of only one pack job.
As far as specific dives go, the following 4-Man formations are the building blocks for a majority of other formations including the dives for the World Cup sequences: the star, diamond, stairstep, donut, bipole, caterpillar and compressed accordion. In building these formations, each diver should fly to his designated position and stop. When all four divers have done this, the formation will be complete. If two divers are supposed to be flying at 90deg. to each other in the completed formation, they should dock at 90deg. to each other, such as in the star, stairstep, diamond, donut, and bipole.
If the first two divers into position are supposed to fly in line or parallel with each other, they should stop in that relative position and fly no-contact with each other, as the two remaining divers dock into their appropriate positions. This process of building formations proves to be the cleanest and quickest method, and can be used to build formations of any size or complexity. Of course this takes right-on approaches and fingertip docks or all chaos will break out.
Being able to fly formations with no-contact will help clean up body control considerably.
Some little tips on grips can help the success of these skydives, such as picking up a leg grip directly at the knee to give the gripped diver complete freedom of his leg movements. Also, outside knee grips should be used when gripping right hand to right knee or left hand to left knee. This grip is used when building donuts, bipoles, caterpillars and compressed accordions. Inside knee grips should be used when gripping right hand to left knee or left hand to right knee. This grip is used building facing stairsteps, wedges, diamonds, etc. An easy rule of thumb to remember this by is to always have "thumbs up" on all grips.
When building opposed stairsteps, wedges, and diamonds, etc. the arm grips should be inside elbow to inside elbow, as opposed to gripping at wrists or catching only one grip. Symmetrical grips by everyone at every grip point greatly improves the stability and flying characteristics of all formations.
It is often difficult to build bipoles by flying backwards directly to where your slot will be, but with practice it can be accomplished. An intermediate step which may be used with good results is to build a hook-up and then have the other divers take turns flying into their slots backwards in a pre-determined order. The secret here is to have good catchers in the hook-up, as it is much easier to turn around as you come into a slot, than it is for two catchers to simultaneously release the wrist grip and take a knee grip in one fluid move.
A good exercise in flying backwards may be practiced by building a bi-pole in the above-mentioned manner, and then to make a total break and switch positions to build a second bi-pole. Now, the original catchers fly backwards and the other two catch them. This can be continued until break-off. This is another very good exercise for cleaning up body control. Larger in-outs can be readily built by both these methods also.
Building and flying donuts is difficult. A common problem is that the donut will spin in the direction the divers are facing. One solution is to hold the outside arms out to the side at about 45deg. and slightly in front and above the shoulder to prevent the spin. A common cause for spinning donuts is poor grips and practice is the easiest way to solve this problem. The ideal way to build a donut, as previously mentioned, is to fly to your slot and dock on the designated knee with an outside grip. The last diver flying into position closes the donut.
When flying in and donutizing into an existing donut, the outside divers make caterpillar grips on a diver in the donut. The diver behind that person in the donut can then use a grip switch to enlarge the donut. When flaking a donut, remember to grip the leg before the arm if both cannot be reached at once, or it is apt to spin in the direction the divers are facing.
One of the most enjoyable forms of relative work is flying with a group of two or more divers gripped together and docking with other flying groups to form a single new formation ("flying pieces"). Only imagination will limit the size and number of these groups flying together. When two or more groups do relative work with each other, the same basic theories of individual flying hold true.
However, some special considerations must be taken into account. With two divers gripped together, there is twice the mass as compared to one diver falling alone. Along with this, the inertia is also doubled, so it takes twice the energy to start the two accelerating, and twice the braking power to stop this movement.
If both divers have complete freedom of movement, they can control their flying with the same methods and efforts they usually use flying individually. However, if either of the divers has restricted freedom of movement due to the grip or grips between them, then an exaggerated use of their remaining flying controls will be necessary. This does not pose much of a problem with two divers, but it will become much more evident the larger the flying groups become.
What about brakes? Once a large group is moving through the sky, it will have more momentum than an individual alone, and it will take more effort to slow it down. If, for example, a 4-man diamond needs to slow down, the lead person will not be able to use legs to help. The wing people will have marginal use of theirs, so it is up to the tail to do an exaggerated knee-drop, using the knees like flaps on an airplane or the tail feathers of a bird, causing the diamond to slow down. The wings on a 3-man wedge are able to use this same method to slow down, but they must brake simultaneously to avoid turning the wedge.
Correct and symmetrical grips are necessary to achieve maximum flying coordination. Also, symmetrical body sizes should be used as much as possible when two people are flying parallel to each other in a group. The less tension between the divers within a flying group, the easier it will be to fly together. Each diver should do his or her part to fly with the group, so there should not be anyone being dragged along for the ride. Don't over-fly your partner either.
A clean and symmetrical break is highly advantageous when splitting up a formation to form two smaller ones. First be sure that the original formation is complete before breaking it. Total eye contact with head nods and mouthing the "break" command works well.
A system of shakes to the divers with the controlling grips from the divers monitoring the completion of the formation is a good method when eye contact is not possible. This will take some concentrated ground practice to achieve good timing and symmetry with all the breaks. It is most important that the system used works accurately. Flying groups together is quite similar to flying individuals together. Each group flies to its designated slot and docks. As with individuals, it is important that the groups are able to fall at the same relative speed. Eye contact between each group is extremely important prior to docking, especially if the groups have been rotating and have lost eye contact for several seconds with one another. All the groups should work toward the lowest one if one is lower, and then aim toward a central point between themselves and dock simultaneously.
Otherwise, if two groups dock together and a third is still approaching, the two docked groups may tend to fall slower and float above the approaching group.
When docking groups in stages, certain additional procedures should be kept in mind. For example, in round 2 of the 8-man World Cup event, four 2-man stairsteps must separate from the original double 4-man diamonds and exchange partners to form two new 4-man diamonds. Two wing people from the original diamonds now become points on the new diamonds. They should move their heading 90 degrees toward their new partners and line up with each other on the same level. They should try to keep minimal separation between them in order to easily dock the two diamonds after they have been built separately with docking stairsteps.
If, after sorting your way through all this, you still feel that it is all fine and good for those advanced skydivers at the big DZ's, but that it really doesn't apply to your circle of friends jumping out of a Cessna on your small drop zone, stop sniveling until you put a little effort into it. A small drop zone and a Cessna add up to one of the best learning atmospheres possible if the skydivers apply themselves. It is a common fallacy to think that the elite group you read about is the only group who is good enough to do something. It has been proven over and over that once a group finally tries something, they find out how easy it can be. Remember that it is easy for a group to be the best at something when they are the only ones doing what they are best at. It's all in the imagination! Think about it and then go for it!
-BJ Worth. 1976
Tips on Starting a Sequential Team.
Reasonably expect disappointing jumps for 15-25 jumps together. It will take that long to "click" but when it comes, it'll be so simple you'll wonder why you couldn't do it before.
You must change your thinking about flying. Sequential techniques are so much different from speed star techniques that you have to un-learn some things and completely relearn the new techniques.
Don't dwell on the details of the attempted jump until you can do the airwork. In other words, don't worry about the exit first. Perfection must precede speed.
Clean is good. Try to fly clean, not fast. Another difference between sequential and speed stars is that in 10-man you classify fast as good; the final determining factor on which you are judged is how fast it was. But in sequential, it's how clean the formation was, or it won't be judged as complete. Work on clean first, then fast.
Keep a team log.
Learn to fly tight but stable formations. Do not rush formations. From the very first maneuver, particularly the first maneuver because it's subterminal, you have to let the formation settle completely before you transition. If there's a ripple developing and someone lets go to sequence to the next formation, that ripple could fling everyone 30 feet apart. Practice holding each formation at least two seconds and feeling when it's completely stable.
Fly to help each other get into the formations. Don't rush the formations; build them clean; make sure your individual entry is clean and doesn't turn the formation, if you're one of the first ones in. Everyone has to fly themselves to help each other out. This sometimes means you fly the formation over, down or up to whoever isn't in. (Tricky, but learnable.) In speed stars, you're concentrating on wrists. In good sequential you have to think about your entry as it relates to the other people. If this means you have to fly slower than you are capable of, so you get there at the same time as everyone else does, then you fly slower. The base person of a formation should fly to equal distances between the other jumpers. The third person there should wait until the fourth person arrives before contact is made.
Good communication is vital. Give definite shakes. Learn to know when everyone feels the formation is stable and it's time to sequence.
Practice no-contact RW. A quick no-contact four-man star is necessary for throwing a donut. You're all there, no-contact, the key person nods and everyone turns and grabs. You also practice no-contact if you're the third person to a formation and #4 isn't there yet. You fly in position and wait til #4 arrives; then both people grab on.
Practice flying over top of other people without losing air or funnelling onto them.
-Pat& Jan Works
The Skydance Resonance
Start with the theme of local and global
  of doing the basics while keeping track
  of position and timing and matching rates
  and altitude and all the rest

And then explore the known dive pattern
  some variations and things
  to see how they really are
  with people who can do them

Make explicit
  the ideas, principles, techniques, outlook
  of the skydance approach
  to Boogie Mechanics

And after Easter we'll take off into the unknown.
-Skratch Garrison, 1978
Four-Man Sequential ... or How to Have Fun from a Cessna.
The majority of drop zones don't have Twin Beeches or other 10-place aircraft. Every weekend more people dangle from Cessna struts than bunch inside small-door Beeches.
Still, large stars and fast 10-mans have received such wide acclaim that people on small drop zones sometimes feel they can't do good relative work because they can't get ten or more people up at the same time.
It's a quantitative view of relative work -bigger, faster, better. Certainly big stars and fast stars require good relative work, but there is also a qualitative approach to skydiving which holds that the sophistication, diversity and execution of a dive are more important than how big or how fast it is.
Sophistication and diversity are where sequential routines come in. People limited to four players by their Cessna can enjoy nearly unlimited challenge by using ever more difficult and diverse sequences. A four-man sequence uses some of the same formations as four-man competition, but instead of always back-looping from a star to a formation, a sequence moves smoothly from one formation to the next.
Sometimes just by changing grips. Sometimes by breaking and reforming. Sometimes by breaking to pairs and redocking. The idea is to fill the freefall with as much flying as possible.
A group can design its own sequences to challenge the ability and experience of its members. A group of inexperienced flyers may start by using the whole freefall to build one formation. They can then use that formation as a base from which to sequence and add onto as they gain experience.
A group with more experience will try a more difficult base formation, longer sequences, and more complex transitions. Whatever your experience level, sequential offers a chance to learn, a chance to expand the limits of our experience. Diversity in our interactions, sophistication of flying techniques; this is the way we learn and grow.
Here are some four-man bases and some of the possible transitions used to connect them. Stick-man drawings are an awkward way to represent skydives, so try to think of the drawings as symbols of real freefall experiences. Mostly, try some of these things in the air; that's where they belong and they make more sense up there.
The technique for building most of these bases is self-explanatory. Some, however, require relatively new techniques.
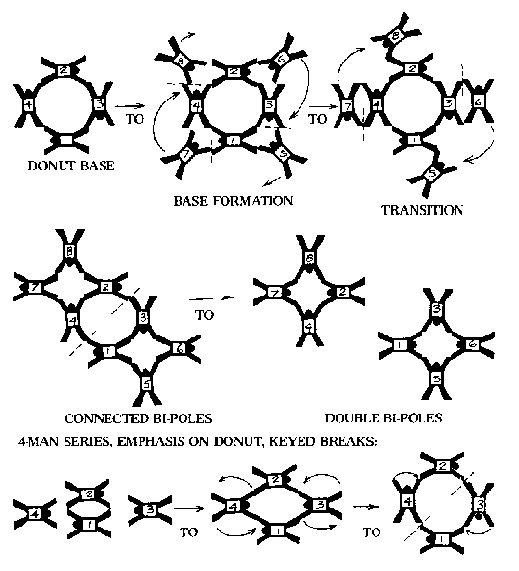
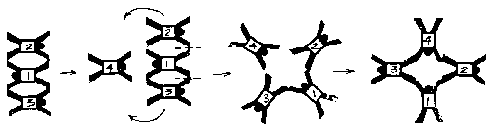
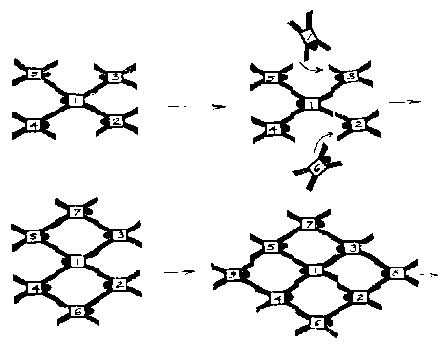
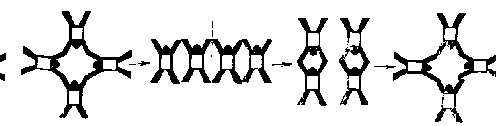
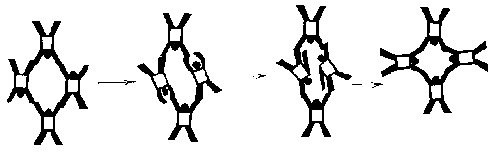
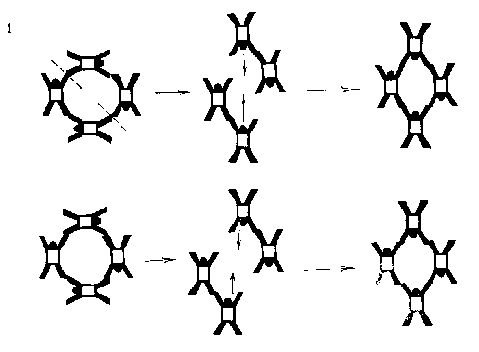
Bipoles and donuts stem from the compressed accordion pin. Compressed accordion pins can be tricky to learn. Practice them; try to catch each other at the knee at the same time. A bipole can be built from a three-man compressed accordion by opening the compressed accordion and having number four close the bipole.
COMPRESSED ACCORDION PIN
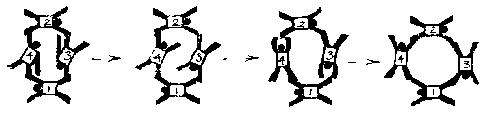
A donut can be made by building a donut diamond from a compressed accordion pin and donutizing.
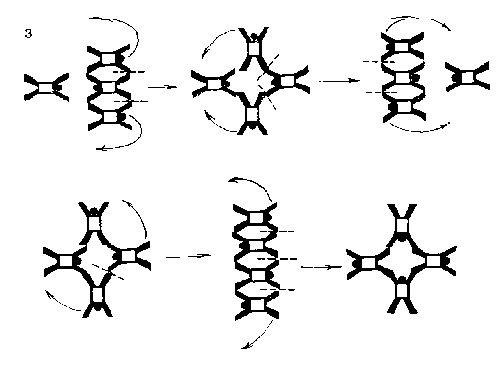
There are many ways to string these bases into sequences. Here are some of the possibilities:
This star sequence is the oldest sequence around, and is still a good place to start if your group has never tried to do more than one formation per free fall.
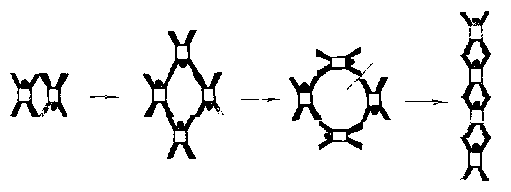
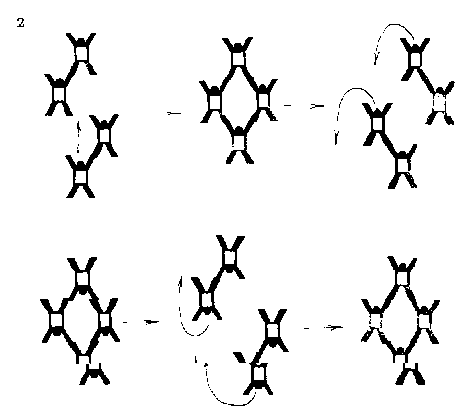
This is a simple donut sequence starting with a compressed accordion pin. It sequences by a series of grip changes. Once learned, the sequence can be extended like this.
To move from a cat to stairsteps, the cat breaks to two cats, then grip-changes to stairsteps. The diamond is then built by docking the two stairsteps. Flying hooked up with others is really fun, and plays a large role in sequential relative work.
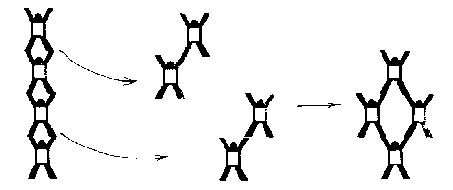
This sequence uses a bipole as the base formation. The bipole can be built from a three-man compressed accordion, or if you want to add a new flying technique, from a three-man Murphy with one man flying in backwards...
.... or even from a two-man with two back-ins. Flying in backwards isnot only possible but relatively easy and a whole lot of fun. The sequence could be lengthened to include a cat and another set of stairsteps to a diamond, as in the previous sequence.
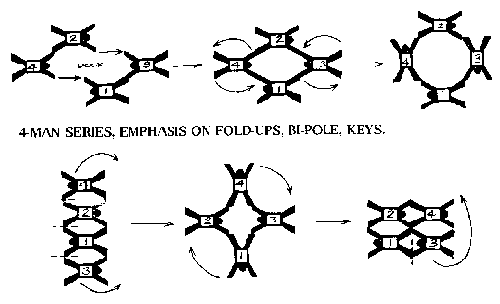
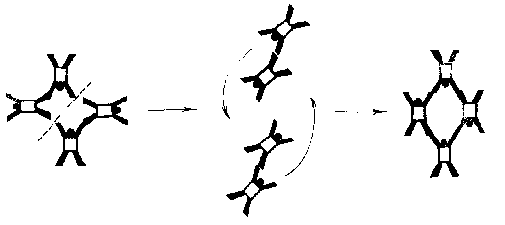
This sequence starts with a four-man compressed accordion, and uses fold-up, fold-out techniques to sequence. This set of moves, like many others, is reversible. You can go from a bipole to a double compressed accordion to a compressed accordion as easily as the other way around.
The base diamond can be broken to either left or right hand stairsteps. To move from a facing diamond to a four-man star, these grip changes can be used.
The star is then broken and reformed as a body star. Body stars are odd formations, tricky to build, with a high spin factor.
Once a few simple formations are learned and an understanding of some transitions is gained, the group can begin to design and execute more complex sequences. In designing sequences, remember that the important thing is to incorporate flying that is a challenge to your particular group. You can work up to more difficult sequences by planning practice sequences that repeat a specific move you're having trouble with, like building a stable donut or flying stairsteps or building bipoles or accordions.
Here are some examples of practice sequences:
Remember, sequential routines require teamwork. Find some people willing to learn, people not afraid to blow a jump. Work together on a sequence to find the best timing, simple ways to key transitions, and the right grips. Plan a routine, then walk through it on the ground to work out the grips and keys. Talk your dives over as a group right after you land. Each player sees the routine from a different point of view, so work together to solve problems and to plan new techniques.
I hope this article will acquaint you with the mechanics of four-man sequences. It's up to your own imagination to make them become a real freefall experience. Four-man sequential is a format for good relative work, and good relative work is its own reward.
Editor's Note: Matt Farmer was a member of the 1975 United States Freefall Exhibition Team.
Matt Farmer. Parachutist. January 1976.

Quality Vs. Quantity & Serial Sequential.
... so there are only three spaces for a "filler load"... so the 182 is the only airplane on the drop zone and it will only carry four ... so the Twin Beech is down and the 206 only carries five people ... so you think six is a weird number to make formations with.
Why even bother jumping in those circumstances? First of all, because you love it. Secondly, you may well find yourself learning as much, if not more, on dives of this size than you do on the mega-loads that are the goal (or the routine) of so many jumpers. There are some among us who have moved much too quickly into dives of the two-figure magnitude or who, despite significant talent and experience, could benefit greatly from doing smaller and better things more often.
One of the hindrances to making small group dives efficient in terms of interest and experience gained is a lack on the part of the organizer of knowledge of the things that can be done. One of the advantages, however, of groups of this size is that there doesn't really have to be an organizer - you can just get together, decide on a dive plan that suits everybody, and discuss the moves during the dirt dive. With ten or more, that method usually takes hours and produces little.
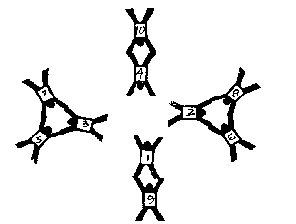
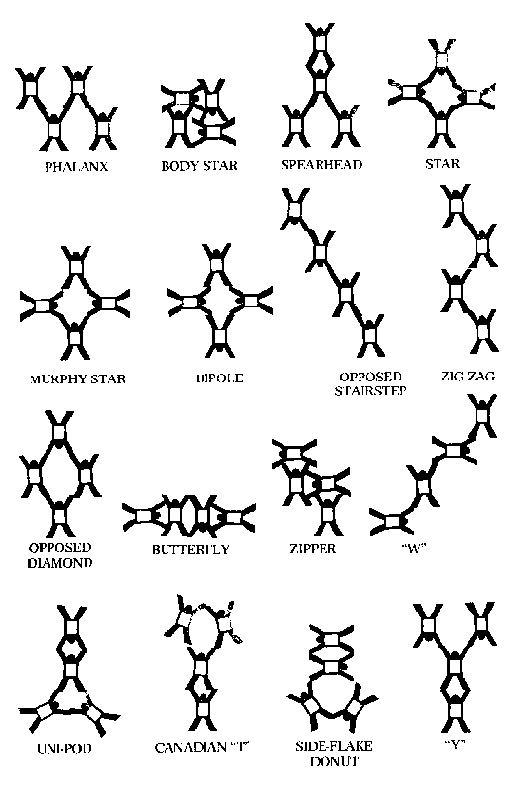
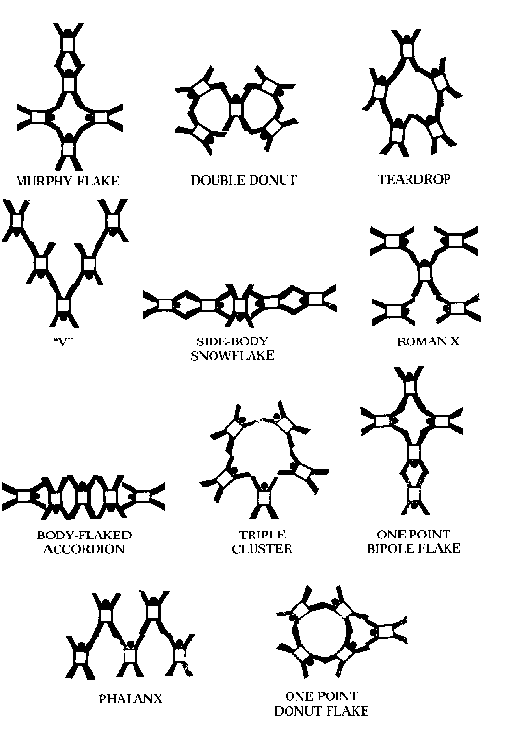
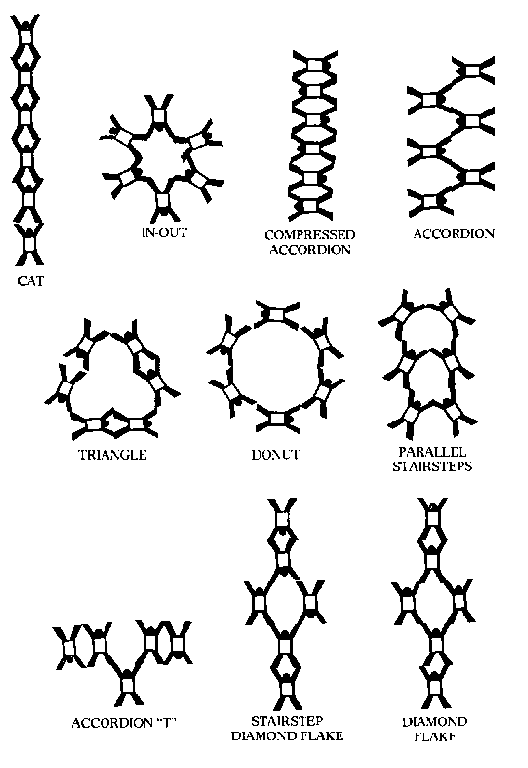
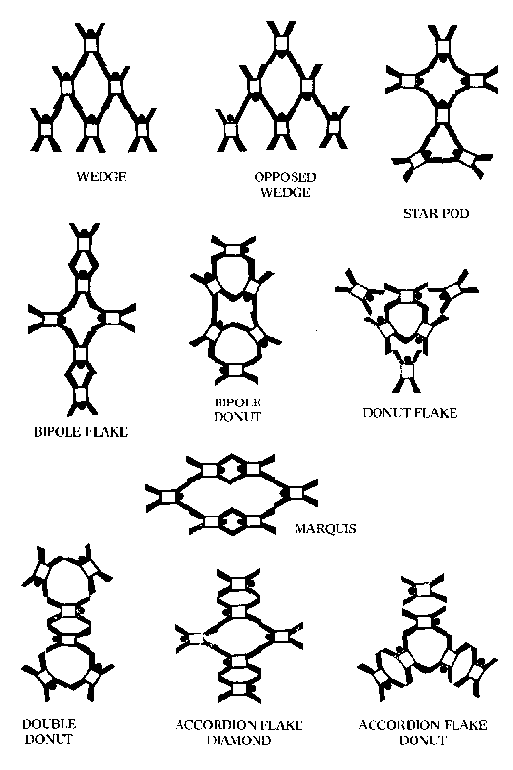
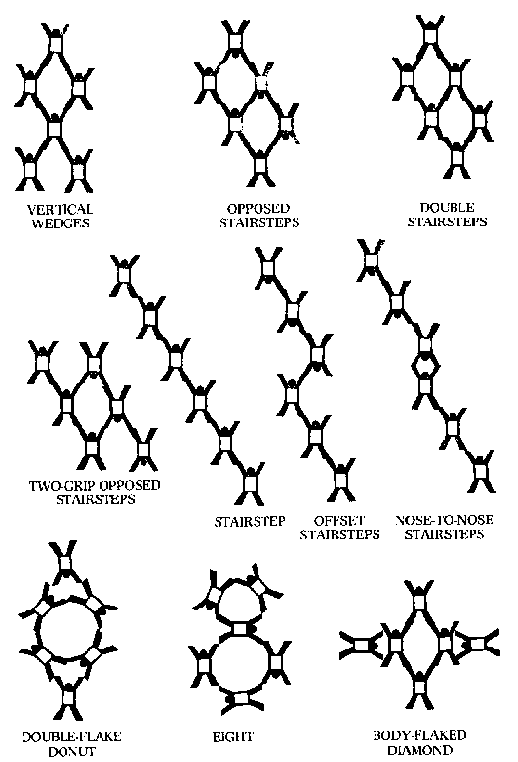
The following sets of formations and maneuvers are for groups of from three to six. The names are attached simply for the purpose of communication. They have nothing to do with the way you do them, only with how you talk or write about them.
There are a lot of formations for any number of people and when you start combining them into sequences, you could do a lot of jumping without ever repeating a dive. One thing that may help is a change in perspective. Try to become less concerned with completions and more with doing better skydiving. Concentrate on:
- refined techniques.
-faster approaches with less (preferably no)
momentum when a grip is taken.
-smoother flow in a sequence.
-less
shaking and nodding signals, and more "sensing" when a formation is
completed and knowing when it is time to transition.
All of these contribute to increased awareness and better flying and, if they aren't learned here, chances are they won't be learned at all.
Small formations are the pieces of which larger ones are made, and the techniques learned and experience gained on the "little" loads are the ones that all too often are shunned by new relative workers anxious to fly on the big formations out of the big airplanes with the "big boys."
There is a lot to be said for knowing where everybody on a load is, being able to see everything that is happening, having plenty of room at break-off time, not having to spend an hour and a half organizing and dirt diving, and being able to reconstruct a dive afterwards without chasing everybody down or listening to a dozen people talking at the same time.
As you look at these formations, and before you dash off to try the ones you haven't seen, think about them for a while - do some innovating before you get the load together.
You can, for instance, look at an entire set as an "eight minute skydive," done with several interruptions to air out your rig and repack it. Start out by arranging them in any order you want, then dirt dive a few of them as a sequence. Make the jump and see how far you get. That point can then be the beginning of the next dive.
Repeat the process until you finish the set, then reverse the order or mix them up and start again. One pass through will keep you busy for a bunch of weekends and by that time you will probably have thought of some more yourself. You could put each formation on one index card, shuffle the deck and draw several at random, doing them in that order.
Which brings up a point of view ... I have always felt that any time you finish everything you have planned for a dive and have time (feet) left over, you are wasting time that could be used for learning more - enjoying it more - unless total completion was your primary goal. Plan more to do on a dive than you think the group has a reasonable chance of finishing, that "guarantees" that you will do all you can. You might be surprised.
Start looking for goals other than completing formations. If nothing else, you will stay in a better mood. Figure out the most efficient way to transition-grip switches or flying. Try doing them "contact, no grip" (just fly in position and occasionally tap the knee or elbow you would otherwise be gripping). Make vertical transitions when they are appropriate. "Practice stopping completely in a slot, then taking a grip."
Work on keeping the formations on a precise heading, or turning them to a pre-selected heading. Think about taking the first formation "out the door"-build it first, then fly it off the step or out the door. All these techniques are necessary or "nice-to-have" in doing large static or sequential flying, and small loads are where they are learned.
If you really want to get innovative, try some of the following:
-have one or more of the people in the formation fly inverted.
-roll a formation.
-track a formation, doing S-turns.
- mount riders on the people in a base formation.
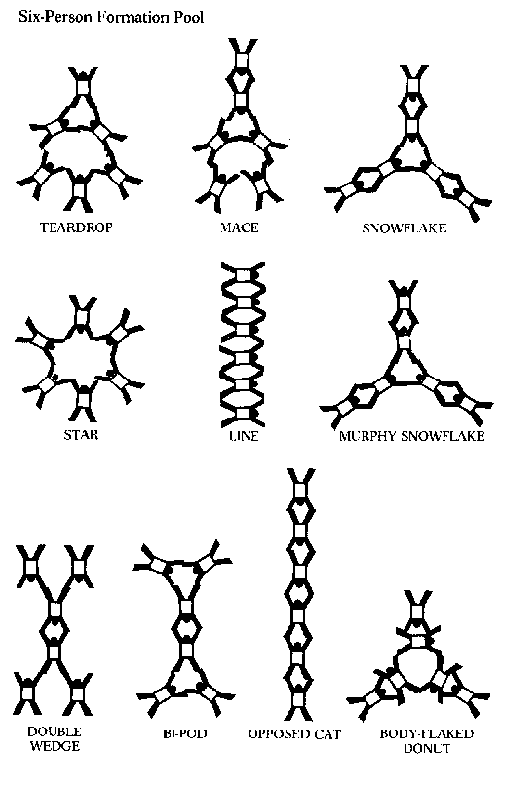
Three-Person Formation Pool


A Voyage To Grabclutchland: Ground Practice.
Ground practice in relative work can be an effective conditioner for both mind and body when done before every jump, whether a fun-jump or a team practice load.
It may be compared to rugby or football practice or any other team sport where coordinated interaction with one's teammates is required. You learn to work together and coordinate your movements on the ground so that every maneuver becomes reflexive, then the jump will fall together more easily in the air.
It requires a lot of jumps to develop group skill and team attitude and that is why you must supplement airwork with ground training. All good teams do ground practice. Even if you are planning just a "fun" jump with 4 or 5 people, a run-through on the ground before the jump will quickly reveal any traffic problems that may pop up in the air, and will help get everybody's head in the same place.
On the ground, slowly walk through the entire jump at least four times before every load. Have someone count the seconds out loud; listen to the cadence. Build the star (standing) just as you will in the air, starting from the plane. Imagine that you are in freefall. Don't build a star in four seconds if you usually take 8-10 seconds in freefall.
If you're doing 4-man RW, key off the sequences just as you do in the air. Walk into the next formation in proper sequence and timing. Then imagine break-off time and practice pull sequence.
It is a lot easier to learn the various formations of 4-man RW on the ground rather than wasting a lot of time in the air. Spend a lot of ground practice learning the mechanical steps. More importantly, spend some time to learn the cadence of the jump so that you all feel together every maneuver. Do it the same way each time.
Pat Works. Rwu, June 1974
To Be Faster, Don't Think Speed ... Think Good RW
"You will begin to touch heaven, Jonathan, in the moment that you touch perfect speed. And that isn't flying a thousand miles an hour, or a million. Because any number is a limit, and perfection doesn't have limits.
Perfect speed, my son, is being there."
From Chiang's advice to Jonathan Livingston Seagull (Richard Bach)
Peak Function
Peak-Function- That is
what a skydive is -
A place where you can peak-function -
A time when
you can be ... all there -
With simultaneous awareness-
Of all the
different aspects-
The intellectual calculation of alternatives -
The
laws of physics ... And experience -
And feeling the flow of the air with
your whole body -
And the sense of ... quality ... artistry -
That makes
you choose one path -
From all the many that are possible -
To put it
all together -
As a thing of flowing beauty -
Peak-Function ...
Skydiving --
-Skratch Garrison. August 1. 1975
Hints For Neophytes, Or, Why You Is A Spastic Clod at RW.
There are at least four reasons why you are a toad in the air:
1) You're so tense from trying too hard and being generally freaked out that
you don't have energy or coordination left to do a clean swoop.
2) You
aren't aware of the differences between momentum and non-momentum RW.
3) You
are basically dumb and your reactions are on par with a sloth.
4) Your
friends are basically dumb and can't use the language well enough to give you a
meaningful critique.
Of the above, we'll deal with only the first two.
On Being A Stiff. The state of being overly tense and uptight requires the expenditure of both psychic and physical energy. Since you have only a limited amount of these energies available to you, any excess expenditure must be subtracted from energy you oughta be using for RW. As a result of being tense, you can't think or react properly and so, you screw up.
Since screwing up makes you even more tense, you may actually seem to get worse in your RW. So you're tense on your next swoop ... etc.
Tenseness also has a mechanical ill-effect. Any rigid object is hard to control in a wind blast of 120 mph. Try this simple experiment: Make two jumps. On the first carry a 4-ft. length of lumber with you. On the second carry a like-sized piece of cardboard. Now, which was easier to control in freefall? The point is, if you keep your body rigid and tense you'll have the same kind of control problems you had with the lumber.
Obviously you have neither the energy nor the control skill to stay rigid and tense during RW. So relax! While RW-ing you should be no tenser than you are in the bathtub (except when you need to move as in a track or when braking, etc.) This relaxedness should be mental, too.
Later on, when you become a super-dynamite, ace-expert, sky-god RW King, you will discover that certain types of rigidity can help. Some rigidity, i.e. pushing the air rather than always letting it push you can, in many circumstances, make you faster, more precise, and improve your general RW ability. But for the beginner the most important thing to do is relax.
"Easy for you to say," you say, "but how?" True, telling someone to relax does not insure that the novice can do it. Often it has just the opposite effect. Telling a jumper, "Look, if you don't relax in the air this time I'd better not see ya when we get to the ground, cuz I'll bust your head," probably won't help him relax unless he's a special case. A jumper can, however, learn to devise methods of relaxing that work for him. One of the most common devices is to take a few deep breaths a few seconds before exiting - it really works. Some jumpers like to move around and shake a bit to get the heart going and the blood circulating; others have devices that are very personal but work for them.
Take a relaxed, aggressive "attitude" toward RW and you'll be faster. More importantly, relaxing in the star makes the star fly better and thus makes it easier for the guys you burned to get in. ("Perfect speed ... is being there."-J.L.S.)
SPECIAL NOTE to feather/asses who tend to get in OK but float like a potato chip once they touch wrists. If your entry is not too high to start with and your ass floats up no matter what you do, then you are probably tense in the waist, back and legs. Even when you bring your knees in you float'causeyou bend your back, too. Arch your back and relax your waist, letting your legs to limp and blow up out of the way on your ass. Keep your hands higher than your head.
Types of RW. There are four types of RW: terminal, sub-terminal, momentum and non-momentum. You gotta be good at `em all. You know all about terminal and subterminal (or think you do).
Non-momentum RW is the kind of RW you learned to do first. You get within about 30 feet of the dude you want to relate with and are at his level. You stop dead-still and then hand-track over, you have no velocity or speed left over from your descent track.
This type of RW (non-momentum) is difficult to do well. Experts at it seem to have a motor and can dance on the columns of air beneath them. You need to be good at non-momentum RW to try to enter a really weird and squirrelly star or you won't get in.
Momentum RW is the kind of RW you learned to do (or will learn to do) when you build competition stars. In momentum RW you never stop or slow down; you maintain track-generated velocity and redirect it to enter. Your approach angle is very high. You must be very aggressive, and your chances of a wipe-out are higher. You generally use the "mush" entry in momentum RW. The "mush" is a high-angle, high-velocity approach, differing from an at-level approach.
So you gotta be good at non-momentum RW for the last couple of feet if the star is building fast, or is squirrelly. Also, heaven forbid, you might be so fast you go below and the only thing that will get you in is non-momentum RW. On the other hand, if you're gonna be as fast as you already think you are, then you gotta be hot at momentum RW, too. But, unless you can do a subterminal 4-man, you are not good at any RW anyhow, and need help and practice.
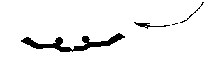
Exit Tip. If you Z out on exit, try to totally relax and let yourself start to go limp. You'll find yourself stable a lot sooner. Realizing that your initial exit is done on air pushed by the propellers rather than the ground should clean up your act quickly.
NOTE TO INEXPERIENCED STAR-MASTERS. Put at least three good people up front for a serious attempt. If you're making a serious RW attempt, these slots are absolutely key. Putting a toad base, pin or third will mean you have a poor-falling, slow-building mess. OK, now smile, relax and swoop lots!
REMEMBER: Everyone is a one-man star. To build something bigger, you gotta do RW.
Pat Works. R Wit, January 1973.
Body Dynamics. This condensed fairytale is for novices who do not yet fully understand body aerodynamics.
BASICALLY, YOUR ARMS CONTROL YOUR ALTITUDE AND YOUR LEGS CONTROL YOUR SPEED.
It's hard learning to control your legs properly because you cannot see them. Get the feel of the positions they're in. Practice bending, straightening, and pointing your toes on the ground. YOU HAVE TO BE ABLE TO THINK OF WHAT YOUR BODY'S DOING BEFORE YOU CAN IMPROVE YOUR RW.
Tracking. Your arms control your descent to the formation below. On a 90 degree approach, you should bend at the waist in a reverse arch and place your arms behind your back. Arms should be straight and your hands should be above your shoulder blades. Check diagram below.
On a 45 degree approach, your arms should be in a medium delta.
And on a level approach, your arms should be in an "Iron Cross" position to gain maximum lift. Your drive towards the formation is obtained by straightening the legs and pointing the toes.
Adjust your arms according to the position (angle) you find yourself on. It'll be different every jump.
Approach. Always look where you want to go. Your body will follow your head. Your approach should be relaxing into a frog position and coasting toward the formation with speed generated from your dive.
If you are going to overshoot and go over the top of it, (arrow) pull your knees up to sink you out.
If you are sinking out (arrow), extend your legs and assume the "Iron Cross" position. Keep coasting towards the formation.

If you are sliding to the left or right, and not straight at the formation, you have to tilt your body to correct. A slide to the right is corrected by tilting to the left.
This is accomplished by pushing your left arm down, lower than your right arm. Your body will slide in the direction of the lower shoulder.
Final Approach. Final approach is made by relaxing and keeping your elbows bent and down in front of your chest. If you extend your arms to reach for wrists, your armpits will inflate and blow you out of the slot.
If you're having trouble, explain the jump to an experienced jumper and ask his advice.
If you want to get in quickly, you'll have to learn to control your swoop with speed from your dive. Hand tracking should only be used as a secondary technique when you miss on your first swoop.
Roger Nelson, Freak Brother Flyer #3
If you're a lightweight and have trouble flying in the star, take heed!
It's been customary to tuck up the knees to keep proper altitude in the star. This only creates tension and makes it nearly impossible to retain your grip. You must refrain from inflating the armpits of your jumpsuit. To prevent this, keep your forearms parallel and below your body by bending your elbows. Arch your back, keeping the head high and bend your knees so that your lower legs are in the burble from your thighs. Point your toes straight up (to keep an awareness of the position of your legs).
The faster you need to fall, the more you pull your head and body into the inner circle of the star.
Practice this on the ground. It's a lot cheaper than practicing it in the air. I weigh 180 lbs. fully geared, jump bells, and haven't found a star that I float in. If you don't believe me, try it. It's a lot easier.
Carl Nelson. Freak Brother Flyer #2
So you're having trouble getting in. You seem to be coming in nice but all of a sudden, you're jamming past in a heavy left slide. On your next jump, all you can remember is seeing the star flyers tuck their heads in their shoulders and make an 8-man look like a 4-man as the colors quickly rushed by.
As a new swooper, you now must realize the people holding it don't like being bowling pins, and that going 100-feet below is just wasting your precious $. Believe me, it's a lot better to use your working time coming in rather than in a reverse arch. Go slow and don't expect to get in every jump. But with practice, you'll soon get closer and closer. And soon, with about 300 swoops, you'll be at the gate of "Skygod."
There are two basic approaches, momentum and non-momentum. The momentum being not stopping until entry. This is an approach only recommended for Skygods.
Now to break down on the approach. I personally feel there's three variations on an approach angle, one being the "L" approach when the diver drops his head out the door and dives to pick up working speed called the down and over.
The next is one I mostly recommend, the "straight-line" approach. This is when the diver gains visibility of the star after prop blast and never takes his eyes off it. Going into a turtle type position steering with head and shoulder enables this approach to be a lot quicker than the down and over. The swooper comes out of his dive and aims for a slot by the feet having much salvage increase of shift and slide.
The last is the one I use and recommend for speed stars or when you get a 30-second exit. It's the "over and down" approach. This is done on exit; the diver flares in the prop blast and goes into a rolled-back shoulders position with his arms pushed about 6" past his trunk, eyes straight, tracking over and at the star with this being a more true, straight approach at the star. Once you've reached over the star, you can sit up and use your speed to drop into the slot. This approach is the quickest, using gravity to its fullest extent; it is also the easiest way to bomb the star. The breaking impact is pushing down on the star instead of in on it towards the middle. Even though this is the easiest to blow, it has a lot of salvage if you don't panic and slide or shift with the star. You'll still burn in there faster than you can imagine.
I recommend never taking your eyes off your target (unless it's a turn for a pre-star) `cause the instant you do, you're not making a straight line.
A tip for everyone including Skygods: keep a better consciousness of your legs for a maximum track, feet and legs together with toes pointed, this is the best and fastest gliding position. Many people only think they know what their legs are doing, and many good people are limited because of this. I've found from studying Karate that exercising gives you a better awareness of your exact body position.
The quickest way between two points is a straight line. The straight line approach is a good one for getting there quickly to set up a slot or to await your approach in a maneuver. It leaves you high for easy setting.
When you find yourself awaiting people designated to form the base, consider pre-stars. They're a lot of fun and give you more flying per jump.
Roqer Nelson, Freak Brother Flyer #7
Flying A Hot Piece.
You can 360 and redock your diamond, wedge or stairstep reallyfast if you do it the easy way.
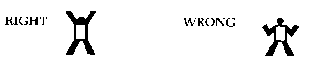
The only grip suitable for formations is made by interlocking your "elbow pits" in your teammates "knee pits." This makes your formation rock-solid, and it will fly as a unit. This grip also prevents the formation from floating, and allows each individual to move their limbs freely, vital for successful formation flying.
If you grab someone below the knee (higher up on the leg as you look at it in the air), you will put tension on your formation and prevent it from flying as a unit. The higher you grab, the more leverage you'll have to screw up the person in front of you.
If you're flying properly, you shouldn't be able to see the complete formation, only the crotch of the person in front of you. Upon mastering level flight, with correct grips, you can make the transition to redocking and tracking your formation.
Let's use a triple diamond formation as an example. The formation is made up from three separate diamonds, each consisting of a point, two wings and a tail. The point people are docked together in a 3-person star. Shaking is necessary when the tail docks to inform the points that their individual diamond is complete. The points use their vision to perceive completion of the other diamonds.
The base three-man is flown with the elbows bent at 90 degree angles, making swoop cords loose. If you fly the base three-man "stiff-armed," you will cause the formation to float, and when making the break to redock, you will backslide and gain unnecessary separation.
The break is made simply by letting go. No shaking is necessary as everyone usually gets the idea when they see one diamond burning them into the turn. The turn for 360 and redock, and the 90 and track are made in the same direction. Ground practice is necessary so everyone knows right from left. (Especially after a joint safety meeting.)
The 360 is accomplished by the points doing a body turn (twisting the trunk and making the arms asymmetrical.) The point is the only person to do so. Everyone else does a knee turn by pulling one knee up toward the chest (right turn is made by pulling the right knee, etc.). The wing people put their arms out 90 degrees to their side to prevent the formation from banking (which creates a slide and unnecessary separation). If the formation doesn't make a level turn, you probably won't redock. The turn should be completed before driving forward until you get a little experience, and hence, a consistent turn. If you're more than 15 to 20 feet apart after completing the 360, you either backslid on the break or did a banking turn.
Driving forward to redock is accomplished by the tail of the diamond putting legs together and pointing toes, while floating a little above the rest of the diamond. The tail should be able to see everyone's backpack, and be calculating the "rush" during the redock approach along with the point and wing people. (This takes some experience, as a 4-person diamond can drive forward faster than one person alone.)
The tail is responsible for braking the diamond's forward drive. This is accomplished by changing from slightly above the diamond to slightly below it. The tail is kind of like the front disc brake of a motorcycle in comparison to braking efficiency. Keep this in mind, as the tail can back the entire formation out of range by sitting up and going a touch below prematurely. The wings can use their hands, forearms and bodies, decelerating in unison with the tail prior to contact at the point.
As soon as contact is made, the tail extends legs and floats the diamond to the level of the newly completed formation. At this point, if you're any kind of Skygod, you can 360 and do it again. If not, you can make a 90 degree turn and track the diamond across the sky.
The most effective track is accomplished by driving horizontally, and avoiding a vertical descent to gain speed. The point slowly goes into a medium delta (maximum sweep of 45 degrees) as everyone places their legs together and points their toes. The tail pulls the right and left wing people close together so that both of the wings'inside legs are close together. This makes the diamond narrow and more aerodynamic. The tail also extends arms, eliminating the elbow pit grip, and maintains position with a secondary hand grip (on the thighs, not the calfs). The tail should now look like George Reeves from the Superman TV series.
From this position, the tail goes head down, nose facing the ground while at the same time shrugging the shoulders and very slightly reversing the arch of the upper torso by sucking the stomach in. Now the tail is driving horizontally at maximum speed.
If everyone else uses their entire body instead of just the extremities in their track, horizontal speed will be around 60 mph. The other diamonds tracking in different directions will be accelerating likewise, creating a bombburst effect with a 120 mph relative speed! This one . s great to blow the Geeks away on your next demo, provided of course, that you all have square canopies.
Freak Brother Flyer. Fall 1976
Additional Tips on Flying Formations and Maneuvers.
Learn to fly using your legs as well as your arms, especially for holding position with a one-handed grip.
When gripping legs, grip the side of the knee or above the knee on the back of the leg, to allow the person you're gripping freedom of lower leg movement for flying. Getting the ankle or foot stretches the leg, increasing float and instability, distorts the maneuver, and restricts the person's flyability.
When forming a cluster, those hooking up between legs have a long reach if the base formation is a 3 or 4 man star. It will help to grip the outside of your man's leg, to decrease the reach distance between you and the man on the other leg.
When building a diamond, an inside knee/leg grip is more appropriate for the wing people. If doing a 4-man diamond or wedge flying and docking, this will keep the unit tighter and falling faster, and provide greater stability in the formation for better maneuverability.
When flying formations, all members must fly smooth and together. For example, in the diamond, fly smoothly the same as you would fly on your own. Don't counteract for the others in the formation. The point man typically controls most of the turn, with assistance from the wingmen. The point can drop the front or sit up and brake (though most of the braking is done by the tail man). The tail controls the forward speed of the diamond, by extending his legs and picking up the back end of the formation to move forward, and sitting up and flaring the diamond to brake. Anticipate the necessary correctionsdon't do anything radical-be smooth and deliberate.
Don't try to salvage a bad approach by hanging on and swinging or climbing up legs. Let go and fly back into the formation. Trying such a salvage often results in a turning base or a righteous funnel. This is especially important in flying a straight-in slot, where the tendency is to correct excess momentum (speed) by grabbing on and swinging wide, then swinging back into position. THIS DISRUPTS THE MANEUVER!!
Try to fly large maneuvers in waves or stages, i.e. in a donut-flake, the flakers should set up and wait until the base unit is complete andstable - don't enter your slot if your side is complete and the other side isn't.
Although our medium is air - don't forget the ground. If you are in a base formation or a docking maneuver, cross-reference the ground to keep from turning or sliding, and don't turn unless necessary.
If you think it's easy to forget about altitude in star-work, it's much, much easier to do so in flying formations, sequential and docking maneuvers. Designate at least one person to be responsible for the breakup of the maneuver. Design your break-off altitude according to the type and size of maneuver. There's a lot different spacing and tracking required of a 16-man diamond than of a 16-star. Design a system of communications for each jump. If you're facing out on an In-Out, for example, just watch the horizon using peripheral vision to pick up the legs beside you, and let the In-men tell you to correct - to tuck up and bring it down by a shake of your legs. If you turn around to see them, you'll probably sit up and backslide into the center.
Take your time. Be smooth. Most people would rather have an incomplete jump because of slowness, than be on the bottom of a righteous funnel at 6 thousand feet, or sit 50 feet away and watch a spinning, sliding base.
Rande Deluca. Spotter. May-June 1975
Wedge Speed.
According to Ed Mosher, the Marshall Mich. police clocked an Exitus team 16-man Wedge on radar. The radar timed the formation at 78 MPH. All the jumpers were wearing Brand X jumpsuits.
Relative Wind. Western Conference newsletter. March 1977
I personally believe in this particular theory in an emergency procedure whether jumping pig or otherwise.
Due to funnels, separation, high breaks and reforms, many relative workers pull between 2500 and 1500 ft. That leaves approximately 8 to 12 seconds of emergency working time.
It is extremely important that the jumper know how he wants to handle each situation. Questioning emergency procedures or hesitations can easily lead to high-speed impact with the dirt. (Which doesn't hurt but makes you look mighty dumb in front of your friends.) Even though you must play all malfunctions by ear, you can still plan an escape and study your ideas until you have true confidence. Recommended minimum pulling altitude is 2000 ft. The reason you pull at that altitude is so you have time to employ your emergency procedures. It's reaction time - meaning if you dump, get jerked upright and look up at garbage, immediately proceed with your streamer procedures. Dumping at 2,000 feet leaves no time for shaking risers or playing with lines.
Many hot dogs will argue that they have shook at streamers many times and probably have. But just one malfunction doesn't put you in the hole. You can only make so many mistakes before it catches up with you. For instance, you took up late at a streamer and have a Capewell hang-up, then going unstable"and missing your ripcord will get you in trouble. Fast malfunctions are nothing to mess with!
A good procedure is to watch your "shit" leave your back to know you don't have a total. Then, check your canopy during or immediately after opening shock.
Riding a line-over or similar malfunction gives you a bit more time but sitting under it wishing don't do nothing but cost you. So get rid of it or shake and hope.
A malfunction is nothing to panic about although it's hard to tell your adrenalin that at times. You pull at altitudes anticipating problems so if you got a problem, go about the proper methods to
fix it!
A malfunction costs time, money and sometimes life. Remember when cutting away: "Don't delay. do it today, cut it away and live to fly another day. "
Roger Nelson. Freak Brother Flyer #6
How to Track Like a Peregrine Falcon.
Introduction: Among many other parachuting credits, Tom was a member of Jerry Bird's All-Stars team which won the first US RW Nationals in `72. An old California jumper, he was a rigger for the U.S. Air Force Academy parachute team before his untimely death in 1974. The fastest tracker in the West, he won the Elsinore Scrambles tracking contest for two straight years. Most of us track. Tom knew how to max-track ... The faster you get there, the more time you have for RW. Herein he reveals his secrets ...
Last September, during the SCR Scrambles at Elsinore, jumpers and whuffos alike were shown what three Beech loads tracking with smoke looked like. The crowd response on the ground sounded as if it were a 20-plus star. There were 10 ribbons of smoke strung across the valley ... three times. A year before there were only 10 people and nobody had smoke. As is true in all cases, when you can use a little smoke, everything looks better.
I've never read any dates concerning the first time that someone realized he didn't just have to fall stable. A reliable source from the Northwest once told me that a student of aerodynamics bet Loy Brydon that it was quite impossible to change one's angle of trajectory from anything but straight down. As the story goes, Sgt. Brydon went up and ordered the wind to blow him across the sky.
I believe that large-star RW was largely responsible for refining the more effective methods of using one's body as an airfoil. We use a track not only to get down and over, but also to ensure separation after the star. Everyone who has done it knows what it is like to go on someone else's bad spot and not realize how bad it is until after the star breaks. I've found that most people will put out more effort and track harder and farther when it's a matter of avoiding known hazards. If you want something bad enough, you'll begin to ask yourself what forces are involved when you are covering the most ground. The subject is speed.
Sources of experience sometime take on unusual disguises. Most people who share the sky in freefall would listen to a man with 4,000 plus jumps. A Russian by the name of Igor sounds like a jump story. I met him at the `72 World Meet, and after watching him do some hand balancing, I spoke to him of balance and muscle control in freefall, which led to the subject of tracking.
We babble-rapped awhile before I got him to tell me how he did it. He contended that his best track position could be practiced on the ground, by finding your center of gravity, approximately one inch below your breast bone, and balancing all your weight on a three-inch tent pole. By holding your body in this rigid position, you can duplicate the strain it takes to hold the perfect angle.
It didn't take but a few full-tilt, boogie tracks to feel the muscles Igor was talking about. To date, my best tracking efforts have been followed by at least three days of sore legs, back and shoulders. I can't think of anything else that you could do that would allow you to flex all the muscles in your body for 60 seconds and not touch anything but the sky.
I have found that the prospect of solitary concentration seldom presents itself in freefall as intensely as it does while tracking. Once I have the position which affords me maximum lift, I hold my body motionless and rigid. To find, keep and hold this position requires the awareness of one's own head. As a mass, your cloth, leather, fiberglass or uncovered head controls the subtle changes of body attitude which affect one's particular lift efficiency. Arm and leg positions can vary as much as the gear people wear.
The most common method goes something like this:
Lay on your stomach on the floor, put heels six inches apart and point your toes until your calf muscles hurt. Put arms three inches from the hips.
In freefall, big gloves work nicely. After all is said and done in the pursuit of your best track, you'll find that it is in your head. Put it in the right place and it'll take you there.
If you have become complacent about tracking or you feet you are already doing everything as well as you can, then I suggest a half dozen purposely mis-spotted tracks for motivation. Because there are no secrets outside the physical size and gear except experience. You must track to get better at it.
Tom Phillips. SCR-236. RWu. June 1974
Down & Dirty - A Discussion of One Side of Skydiving: The Underside.
Look at the little man down there. He looks like a dead spider. There he is, looking up at you, watching you through the 50 feet of sky between him and his slot ...
The slot that would complete your 32-person mega-cluster-blot for a new world's record and your SCR.
You wonder: "Why doesn't he come back up here? What is he doing down there?"
Going below is the most common mistake in relative work. 75 jumps, 1500 jumps; 200 pounds, 130 pounds; male and female; belly-wart and piggyback - they all go below. If they haven't, they will.
Why? That's a tough question. There are immediate, short-term answers: experience, currency and concentration are important. But in the long run it's not clear why this one problem stays with us so doggedly. We've taught ourselves to fly backwards and upside down -but we haven't learned how to keep from going below. Our relative work techniques have definitely advanced, but we've brought our oldest mistake with us.
But it doesn't matter so much why skydivers struggle with the problems of going below so long as we can teach ourselves to stop the habit.
(It should be noted here that a relative worker who was out of sight above the formation "didn't get in." The skydiver who didn't get in, but was seen flailing beneath his slot, is said to have "gone below.")
(That's pronounced: "Yeccchhh!")
Last Sunday, a friend of mine had trouble on almost every skydive. We agreed to sit down later and talk about it; I thought I could help. Lucky for me in the meantime I was able to get below a mega-blot and see the problem first-hand.
It's a bitch.
The hardest approach to a formation - any formation - is from below. (This doesn't include floaters, who have an entirely different skydive.) When you're caught below, you become dead in the air as you start your recovery: you must sacrifice all your horizontal control to go back up. If you're moving sideways on the way up, you're not going up as fast as possible.
A basic law: horizontal movement uses vertical advantage. If you want to go sideways, you're going to have to give up altitude to do it. And, if you're below, the last thing you want to give up is altitude.
If you're below, you're in a reverse arch (or should be) with your head pressed down over that ball of air (nowhere else will do, not even an apologetic glance at your pals above you and the only way you can see anything is between your legs).
It's very difficult to seek your slot from such a position. And very embarrassing.
But, recall the image of the dead spider below your mega-blot and consider the first rule for not going below:
1) Do all your awkward positions above the formation. This means you must take those drastic actions to stop your descent to your slot the instant you see you're getting down close to it.
See, there's a glide path between where you are and where you're going: it's your glideslope. The best glideslope is that one which allows you maximum control range. If you're below your best glideslope, you have to fly a flat shallow path to the formation: a path that requires a big, awkward body position, a position that doesn't allow much control.
If you get stuck flying shallow like that, the only control you have left is the ability to go down faster. And if something messes with your approach (as usually happens) all you've got left is the opportunity to go below.
Don't ever try to flatten your glideslope. You can't. Don't ever accept a flat angle to your slot: you're just asking for trouble.
The instant you see that you're flying a flat path to your slot, FLARE. STOP. REVERSE ARCH UP TO YOUR GLIDE SLOPE. START AGAIN FROM THERE. Don't intercept your glideslope on the way to the slot; enter your glideslope, then take it to your slot. It's much easier that way. Honest.
If there is a first rule about not going below, there must be a second
one.
2) Go to your assigned slot the instant it's ready for you. This is just good skydiving practice. It means you should be ready to fill your slot as soon as it's there. (Air traffic controllers space traffic so the runway is clear as soon as the airplane behind is ready for it.) If your slot is there and you aren't, not only do you stall the skydivers behind you, but you're giving the formation more time to do something flakey-like slow down and "float" on you (and embarrass you).
The third rule is easy:
3) If you're 10 feet up, be ready to take your slot. Ten feet is not enough attitude for most people to sacrifice flying sideways around a formation looking for the right approach. Remember: horizontal movement uses vertical advantage. If you're just ten feet up without a slot in sight, well, it's likely you just can't get there from here.
But, if you're ten feet up and discover you have to go somewhere, the secret is to get big first and get the altitude you'll need (the glideslope you want) for a nice swoop to our slot.
Altitude is advantage.
Then, if you're one of those of us who've had the frustration of seeing neat skydives from their belly-side, there's rule #4. It's specially useful to people who've gone below more than a little.
The rule is a head trip. An attitude adjustment for all our skydives. Follow it closely, carefully, and every skydive can be a newer and fresher experience; you'll do more and learn more.
4) Don't repeat what you already know. If you've been below - really down & dirty and grippin' it - you know how to do that. So don't do it anymore. You've seen the glideslope that will take you to that frustrating air beneath your slot. You must never again get on that glideslope.
Sure.
The problem is one of recognition - being able to pick out what you did that put you off your best glideslope: deciding what was mistake and what was skydiving. It's difficult. There's no one with us watching our every move; and our friends notice us only after we've blown the approach; too late to help.
That's why more has been written on how to do reverse arches than has been said about ways to avoid needing them.
Fogged goggles will not make you go below. Neither will the sun in your eyes, your new Strato-star or the guy behind you in the exit. And, although jumpsuits are important, they aren't to blame nearly as often as many people would like to believe.
Your position in the air is subject to your control. Your body goes where you fly it. If you end up below, you did something with your body sometime during your skydive that put you there.
Pay attention, Think about what you did. Try to remember the flight path that took you below, then stay off that particular glideslope forevermore.
A fine skydiver once said to me after he went below a large formation: "I flared high enough, but it was just falling too slowly for me." Wrong! It may have been falling slowly, but he obviously didn't flare (awkward position) high enough or else he wouldn't have gone below. Period.
Unwanted results point to improper techniques and are called "mistakes."
To recognize mistakes, backtrack from the unwanted results. What did you do before you went by the wedge? And what did you do just before that? You had a clean shot out the door and then, somewhere between your exit and your reverse arch, you did something that put you down & dirty. What was that something?
When you think you know what put you beneath last week's mega-blot (your exit? your dive? your last ten feet? your flare? whatever?) don't do that anymore. Or do it differently. Pay attention! Change something, do something, even if it's wrong. At least you'll be trying something new.
You can't sit back with the same old mistakes that put you below. Go up, and seek your slot from above!
Matching Exit to Aircraft.
She'd been having a real tough weekend. The score was Slot: 1, Below: 4. Not very satisfying skydiving.
It was hard to figure. She tried more jumpsuit, less weight, an earlier slot. Nothing seemed to help. She continued to go below.
So we went up to have a look. It turned out she went out the door in one of the most aggressive head-down dives I'd seen in a while. But, she never took a glance at where she was going.
That was what she was taught four years ago out of Twin Beeches: exit, dive head down for four seconds, look up and flare. She did the whole routine superbly, flawlessly.
But that exit is for Beeches, not for the DC-3 we were skydiving from. The 3's higher airspeed and the longer exits for the large formations we were building-coupled with some light-weight skydivers -simply made her exit technique the first and worst mistake. She was going below the proper glideslope immediately out
the door!
If she got out and GOT BIG IMMEDIATELY, she would have flown up to a much more comfortable flight plan. No jumpsuit in the world, no featherweight gear can salvage a slot unless you give it a decent chance: the right glide path in the first place!
Path To Glory.
Just because you're higher than the formation doesn't mean you've stayed above it.
Usually we're surprised to find ourselves below. One minute I'm in fat city coming to the slot and in an instant I'm trying my best reverse arch.
Why can't we see it coming earlier?
It's important to realize what is below and what is above. There is a best guideslope that radiates outward and upward from every slot; that is your best path to your position. It's different for every skydiver and every formation.
Around that glideslope is a "Cone of Best Control" - defined as that area where you can easily get back to your glideslope and your approach to the slot.
If you get below the cone of control, you're grippin' it: You've given your vertical advantage away and can't move horizontally to the slot. You have to stop and go back up into the cone of control. If you don't, you'll go below.
You can't stretch your glideslope. No, not ever.
Kevin Shea, Parachutist, December 1976.
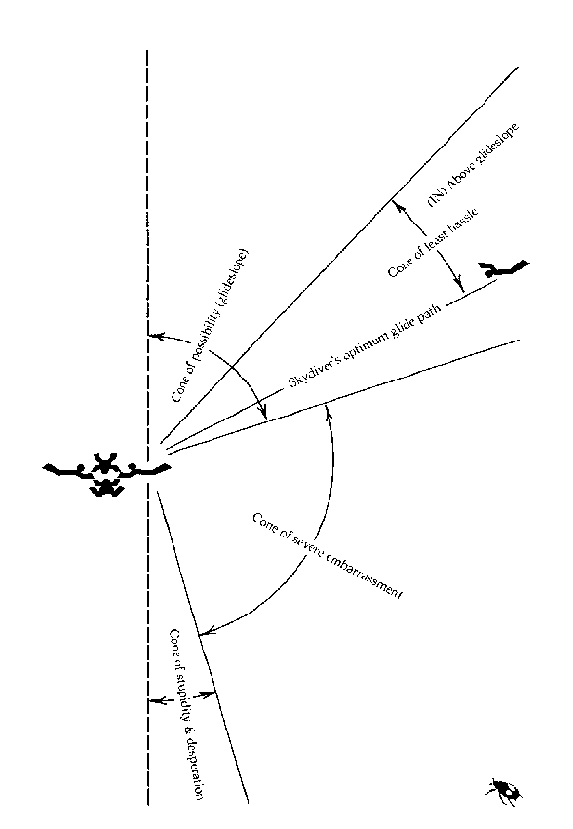
Subterminally Relatively Working.
Exiting slow-moving aircraft, at say, 60 knots, and flying in thin, subterminal air just after exit, with only the prop blast for support, is tricky. If your group can build a 4-man in six seconds, hanging from a Cessna, then you're good at subterminal RW.
The original Greene County 4-man team could do it in less than 4.5 seconds from a C-180. Out of a Twin Beech, Captain Hook & the Sky Pirates builds `em in under 10 seconds with full separation on exit.
True subterminal RW is one-shot relative work ... there's no going back. You gotta do it all on a thin Relative Wind. That means the wind you' re working on originates from the aircraft speed (the prop blast). It takes about 10 seconds to shift so that the wind you're working on is "blowing" from below you as you hit terminal velocity instead of coming from ahead of you as it is on exit.
Here are some things to remember about doing subterminal RW, whether you're jumping a base, pin, floater or flyer position:
1. There is no "base" in subterminal RW. At subterminal every RW'er is either a floater or a diver. A good base is actually a good floater who floats up to where the pin-man will be when they meet in the quiet air.
2. Be aware that your working air starts from the prop blast (your direction of travel).
3. After exit, just lay against the prop blast for an instant; feel it. If you want to move down toward the maneuver, flare briefly against the Relative Wind of the prop blast. This helps kill off the aircraft's speed so that you can start going the other way. You only start to move away from the aircraft's flight path and toward the star when you've dissipated the velocity imparted to you by the aircraft.
4. Then dive downward with a relaxed attitude, making sure you cover any horizontal distance required. Settle into the vertical via an RW Stable configuration (see "The Art of Freefall Relative Work" for a diagram of this position). Settle into your slot and enter.
5. To avoid landing on a backpack or somebody else's body on an expanding or sliding star, modify the vertical settling of your RW Stable into a short horizontal swoop. In other words, use the kinetic energy of your relatively faster drop rate to glide horizontally and enter.
6. If you're good at it, you can drop into a slot from directly above. To do this, you "elevator" down between the columns of vacuum left by your skymates on either side. Locate their body burble with your hands. Feel its pressure on each hand from the bodies on each side of your slot. Dance down the column of air between them using your arms, feet and body to settle in. (By the way, this is a VERY ADVANCED TECHNIQUE and you're stupid to try to use it unless it will work 100% for you. It's a skill you will lose quickly if you lay off jumping, even for only a couple of months.)
7. Instead of trying to "get to" somebody, you should concentrate on where you're supposed to be: A point in space that lies in future time.
8. In order to float, exit in a relaxed manner so you can bodysurf up the wind blast from the prop to reach the maneuver. Use this technique whether you're a "floating" base man or a "floating" flyer.
Pat Works. RWu, October 1975
Special Rocky J. Squirrel Hot RW Hint.
There are three basic track-approach techniques used on competition 10-mans ... 1) down, then across and enter, 2) straight 45deg. angle from the airplane and in; and 3) horizontally, then dive down vertically.
The first is the slowest, and while safer for novices, is actually hard to control. I can't figure out if #2 or #3 is the faster. #3 sure is fun tho ... you have your eye on the star the whole time. (Any traditionalists who might want to argue... I didn't develop these... I just copied some people who consistently get in sooner than other people.)
You have any ideas? If you're good at RW theory, share it with other RW nuts.
Pat Works. RWu, Fall 1972
* * * *
King Kong Died For Our Sins
Flying in a New Dimension: Burbles
"He stole my air."
"Somebody went low and took it out."
"I Z'd in the burble and couldn't get back up."
... all expressions of disgust uttered by "victims" of the turbulence which follows most anything that moves through a fluid, like a jumper through the air.
One thing we as jumpers have in common with others who share the air is an awareness and appreciation for three-dimensional relationships and movement in space. Unfortunately, many of us have spent too much time looking at RW through narrow-slit snow goggles. Witness the poor soul who always tends to approach a formation from a level setup and therefore often "tends" to go low. Those who are consistently "in" have an appreciation and understanding of glide slopes and altitude in reserve and decelerating formations. However, little has been done until recently with designing the third dimension into formations and the transitions between formations.
Not to say that a lot of people haven't flown "over the top" to dock on the far side of a formation when that suddenly became the appropriate way to go, but how often was it planned? Flying under a formation is a more or less universal taboo and has been the source of many an up and coming relative worker's being ostracized from several subsequent loads.
To try to change the trend of thought on the subject, let's talk about some of the things that have been done with an eye toward what can be done.
Four people set up a no-contact skirmish line with about a meter of lateral separation. The jumper on one end dropped down about two or three feet and sideslid underneath the other three people with the intention of floating up into place on the opposite end. As it turned out, his burble successively dropped each of the other three down the same two or three feet and the flyer was in place as soon as he got across without climbing back up. Nobody "Z'd in the burble" and three people completed the cycle in turn.
Lesson #l: When you are expecting the burble from someone flying underneath with lateral momentum, its effect is negligible and short-lived, and can be compensated for.
Four people set up a Polish accordion (zig-zag with hand to hand grips). The jumper on one end let go, floated up about a meter, flew directly over the person next to him and down into the opposite end slot. The objective was to stabilize directly over the slot and sink straight down to dock, instead of making a conventional approach. It worked. All four people made the transition and the only complication arose when one flyer concentrated too much on the slot he was headed for and not enough on generating sufficient initial vertical separation. His knees brushed the jumper he was crossing over and the flyer had to recover and fly up to re-enter. The formation was unaffected.
Lesson #2: When flying over people one at a time with moderate momentum, the burble will drop you down about two or three feet, so that much vertical separation needs to be generated before starting across. If you wind zip level with the formation on the far side, then you have used the burble instead of fearing it.
Five people built a "V," with the point facing the other four. One of the end people let go, flew down the line over three people and docked on the point's leg. Then the other end person did the same thing, docking on the point's other leg. The other two people did the same transition and completed a "V" with everybody facing the same direction.
Next, four people built a straight diamond. The tail let go of the leg of the left wing who then dropped his grip on the point, floated up, straight across and down onto the right wing's leg. Then the point was released and he flew up, over and down to be the new tail. The cycle was repeated three times with people who were not that experienced and had never heard of vertical transitions.
Lesson #3: This stuff is not hard to do.
Five people built a spider. The two people on legs nodded at each other and dropped grips. One flew diagonally under the formation and the other one went over the top, simultaneously, then up and down, respectively, to dock on the "top right" person's legs. The "top left" person then dropped his grip and flew over the top to the new center person's right leg, forming a new spider. Three cycles were completed on one dive with burbles everywhere and no funnel.
Lesson #4: This stuff is fun to do.
The beauty of all these dives is that they are open-ended. There is no such thing as a completion. Motion is the essence of multi-dimensional maneuvering, and a stopping point is counter to that idea. Once a cycle results in the original formation, repeat it without hesitation. Let break-off be the only interruption. Keeping up with what has to be done next is good for developing situation awareness. The dives just described were done by a variety of jumpers, some in this country and some in Scandinavia where they were just learning how to do basic sequential.
Vertical transitions not only work, they are in many cases the fastest, easiest and most logical way to get to a new slot during a change in formations. Whether a flyer goes over or under a formation need only depend on which is best for his maneuvering potential, as long as when he flys underneath, the people in the formation either see him or are expecting him to be there.
Burble Basics. In investigating the burble over an individual jumper (try it) you will find that it is a well-defined narrowing column of air that can be felt, anticipated and maneuvered around. Think about it while flying over someone and you will feel it on your face, then your chest and finally down your legs.
The effect on the air is much the same as what you see when you put your hand flat on the surface of a swimming pool then submerge it rapidly. The narrow column of bubbles that follows your hand is caused by the same sort of trailing vortex that is over your back in freefall.
This burble does make things inside it fall faster relative to things outside it, so the trick is to maintain a moderate lateral momentum when moving directly over or under someone. Of course, the faster you move the less the effect on the guy on top, but tracking speeds are totally unnecessary. just don't stagnate. Over large "dense" formations with small spaces between people there may be one large column of turbulence instead of several small ones, so flying over the top may be potentially disastrous. Use some discretion about easing over the next 21-wedge you happen to encounter.
But with small or moderately-sized formations where a vertical transition might be useful, plan it and use it. You will develop a keener sense of perspective and awareness of the vertical dimension that might previously have escaped your attention.
People are now working on large formation sequential with pieces or groups of flyers making vertical transitions. It is just one more direction we can go, one more avenue for creativity, one more aspect of the ultimate awareness.
Roger Hull, Parachutist, January 1977
Second of a series on How NOT to Do 4-Man RW or, "Doing It With Your Rig On." Have you ever witnessed someone leave the plane, do three unintentional left turns and a back loop just before he goes into a barrel roll - arms & legs flopping all over the sky - before he gets his act together?
Have you ever hurled your body at a star in such a fire-breathing, body-beating track that you had trouble getting your arms away from your sides to flare? If so, you've got a case of the "unqualified muscle" - a disease that can strike anyone. It's muscle that's not ready, or qualified, to do what you want it to. And I'm including it in this discussion about equipment because equipment, as I see it, is everything you leave the plane with. A good mental attitude and good physical muscle tone are as much a part of your equipment as your rig. While a good jumper can acclimate himself to any combination of rig, jumpsuit and boots, very few can overcome a broken mainspring between their ears or a defective body.
Optimum body conditioning is necessary to excel in RW because you have to be able to hold your body in configurations necessary to alter given trajectories while in freefall for the purpose of relating to other people. Your muscle structure relates to the weight and mass of your body of course, but whatever it is, it should be in good shape.
Three things are vital to good RW: 1) physical conditioning; 2) mental alertness; 3) a good parachute so you-can do it again.
The skydiver must be able to push the air around him. That's why the aforementioned wind dummy who was Z-ing out all over the sky won't make a good relative worker until he cures his unqualified muscle.
If you have a four-man team, you should consider adopting a vigorous exercise program (yoga, calisthenics, jogging) together; it will make working and thinking together easier, too. Or, each individual should do it on his own.
Unqualified muscle also afflicts the brain "muscle." Mental preparation is more difficult but sometimes just realizing the source of a head problem is a start toward clearing it up. All relative work starts in the head and if the head is hassled (fights with the old lady, or the boss, $$$ problems) it'll show in your RW. When you bail out to do sequential RW you need 100 percent concentration on your job.
The head can't be separated from the physical person. Physical fitness to many means taking care of everything but the brain. But when the body is run down or out of order, the head usually is too. When the body is beautiful and the head is a blank - that doesn't work either. The body and the brain are inseparable and must be worked on together.
Some people seem to do RW by turning off their head and jumping out the door. That's how stars are busted, grips are lost, formations do not fly well, etc., etc. RW requires constant awareness and attention to what is going on.
Man didn't survive the dinosaur age because he was stronger than the dinosaurs and could force them to do his will. He survived because he was smarter and used his intelligence better than did those prehistoric beasts. So, when you leave the plane, don't be a dinosaur.
Equipment for the most part is a personal matter. Almost any gear can be successfully used for relative work, but it is most important that you be able to fly the equipment you have rather than letting the equipment fly you. It's of relatively little importance whether you are the coolest-looking dude in the air or have the smallest, largest, weirdest equipment on the team. Your equipment should relate to the job you have to do in the air.
Marc Cohen, RWu. October 1973
Be Safe.
We've lost some of our fellow RWers in parachuting accidents ... unfortunately tragic deaths because they could have been prevented so easily - with a little carefulness.
Are we forgetting some of the basic safety rules in RW jumping? When a star breaks, turn 180deg. ... and track (don't everybody track for the spot either) ... wave off... never dump right in the pack.
When the relative work stops, don't stop thinking.
RWu. June 1973
Using The First Seven Seconds.
Revelation: sub-terminal isn't sub-terminal any more. We exit at terminal.* It is the direction of the relative wind, not slower speed, that makes it look like we do things differently out the door.
If you step out at 12,000 feet, accelerate to the advertised 120 mph in eleven seconds and get it out after 70 seconds in the air, somebody else will have to log what was just your last skydive. But you say, "We do fall that long and manage to open higher than high-speed dirt."
Obviously we are falling slower than 120 mph. How much slower? Around 90 to 100 mph appears to be right for the times we are getting. Applying Newton's laws-the physics of falling bodies-shows that one square foot of surface area (like wings)added to your shadow will knock off about seven miles per hour for the same body position. Start with 180 pounds of total weight, reduce it by ten pounds and you will decelerate three more mph. Add those two speeds together and you have ten mph -more than enough to put you below (or take out) any formation. Ten mph is how fast you run if you can do a six-minute mile. The point?
The trend toward larger jumpsuits and weight-conscious skydivers has made a substantial difference in the "average" terminal rate-of-descent. So much so that we now fall at or near the exit speed of the aircraft we jump out of.** The best relative work that has ever been done is being done today and it is being done at the speed we used to call sub-terminal (because it was). We used to think it was a region of poor control where flying had to be done entirely differently, with exaggerated body movements. Some people still think that way.
For the post-exit transition to be smooth and under total control, you have to start the relative work inside the airplane and continue it out the door. You have to present yourself to the relative wind without trying to force yourself into a visual preconception of where your body should be. It shouldn't make any difference to you what the airplane is doing when you get out or where it is after you have left.
If you look at a good single-file exit just as the last person leaves the door, you will notice that each jumper is successively more inclined with respect to the horizon.
How inclined? Being the hot divers they are, they probably don't even notice. They don't care about the horizon. It isn't important or even relevant. It's the wind.
Each of these flyers, either seeing or "knowing" where the formation is, adjusts his attitude and does whatever maneuvering is necessary to get there.
So fly into the relative wind. Ignore the airplane and the horizon. If you want to dive, float, track or whatever, feel the wind first, then do it. The lead who exits and wants to cut down on the time required to form a base-pin can track toward the pin. He looks like he is tracking up, but we know now that he is actually head down into the wind he feels.
Changing from an apparent head-up position to an apparent head-down position just out the door is a flat turn with respect to the wind and it is done the same way as it would be later on in the dive when you are flat. It just looks like a cartwheel.
People who fly differently simply because they have just exited are probably the same ones who come off a freeway on-ramp at 40 mph when the traffic is at 55.
A student who does a rearward door exit from a Cessna in a good arch, then suddenly starts tumbling, probably thinks he is unstable when he sees the sky behind him, underneath himself and then de-arches, when actually he is in only a moderate head-down dive into the wind.
His eyes deceive him because he has not yet learned to feel the wind and to trust his body position. People who always keep at least one foot on the ground normally use vision as their primary reference for attitude orientation. Beginning jumpers (and relative workers) typically continue to depend on it.
More number-crunching reveals that we slow down very slightly after exit for only about nine-tenths of a second, then our total velocity increases slowly to whatever terminal is for the combination of air, weight, jumpsuit, gear and body position. The difference in speed would be virtually imperceptible if you had your eyes closed.
Some folks who take big things right out the door even say you have your best control at exit because that is when you are at your fastest airspeed. I'll buy that. It means the airplane is flying faster at exit than the terminal velocity for whatever goes out the door.
Forward throw is only significant for about seven seconds. By that time drag has reduced your horizontal speed essentially to zero and gravity has accelerated your vertical speed from zero to terminal, ..replacing" the horizontal component. You don't fly on vertical wind alone so you don't have to wait until it builds up. The resultant of the two speeds (horizontal and vertical) is called the relative wind and it is there at the moment of exit.
That is a lot of talking about a small portion of a dive. "All this for the first seven seconds?" you ask. "Yes!" When you leave the airplane, forget about "mushy air" and exaggerated control movements and sub-terminal sub-awareness. Look around, sure. But to fly ... you need to feel.
Damn few of us have enough time in freefall to call it a day. Skydives are expensive and seven seconds is ten percent of a high one. When we are at the point of doing relative work inside the airplane and continuing it out the door, the dead time on the top is eliminated. Freefall with your friends is a rare privilege. Use it all. Enjoy it. More peak function time ... more total awareness.
*Editors' Note: Roger is referring to the desirable high exit speed. Of course, exit speeds of less than 90 mph involve sub-terminal RW, which requires different techniques.
Roger Hull. Parachutist. November 1977. and Can-Para, September 1977.
**More than 80 mph for a DC-3, C-47 or Twin Otter. Exit speed from a Cessna 170 or 180 series, or a helicopter is around 60 mph. No matter what airplane you jump from, a high exit speed is desirable.
"Well, you got me floatin',
Around and around.
Always up, you
never let me down.
Across and through,
You make me float right on up to
you."
These are words from the immortal Jimmy Hendrix who perhaps knew more than many credit him for.
The most important variable in floating is TIMING. You must exit at the exact same time as the base and should be on the side of the formation opposite the direction of flight. This eliminates congestion with the divers.
If you're not on the proper side after exit, you should immediately sit up and get your chest into the prop blast. This will push you into the proper position very effectively. Needing to use your swoop-cords instead of your chest indicates poor timing on exit. If you sit up after you clear the prop blast, you'll sink out which is the opposite of what you're trying to do.
That first 3 seconds after exit is what you must learn to use. If you don't use the benefits of the prop blast, you'll have to wait for your airspeed to build up before you can maneuver quickly and you'll take a long time to dock.
Here's the easy way to float:
Once you perfect this subterminal flying, you can experiment with
competition exits (base back-sliding as little as possible), and you'll have excellent technique for fast pre-stars before the maneuver.
Carl Nelson. Freak Brother Flyer #6
Just exit and move into a relaxed delta (rather than flaring into the relative wind of the prop blast, as a flyer might do). Said another way, after exit let your arms blow behind you and relax your chest as you arch slightly. Like the feathers on an arrow, your arms and legs will "weathervane" you toward the airplane. As a result, you don't turn to face the pin, rather you let the wind turn you to dock with the pin.
Pat Works, RWu. October 1975
Exit is an interface, a boundary, the place where things touch, and everything happens. Exit is the interface between the cocoon of the aircraft and flight on freefall's relative wind.
Exit is the most violent and sudden of aerodynamic, physical and mental shocks you'll encounter during your skydive. When we dive out or let go, we leave one situation for another, and the transition isn't easy.
If you think your skydive begins after your exit, you're missing the point.
The point: your skydive begins when you tighten your legstraps. And, next to canopy opening, exit is the most crucial part of your skydive.
Because it's so violent, sudden and variable, exit is the one place where you're most likely to lose control during your skydive. (If you don't agree, turn around and look behind you on your next run-out-the-door exit.)
Because it's the one place where you have the most opportunity for control, it's crucial to pay attention to it. Exit is the first, best, and perhaps the only place you can sneak past the rules of freefall aerodynamics.
Exit is the short instant where you can use the aircraft to your advantage. Right after you leave - less than a second - the airplane no longer has a direct affect on you. But during exit you can summon power from your relationship to the airplane: leverage.
Leverage: the quality of push, pull, friction, inertia and momentum. Aircraft aluminum provides much better leverage than air.
Help is all around us just when we need it most. The more we pay attention to exit and its relationships (to each other, to the plane, to the wind), the less surprised we'll be as we leave the airplane. And the more stable.
What follows is a guide to making your own exits better. It works for three people, twenty people, Lodestars and Cessnas. You can apply and adapt it to whatever skydiving you'll be doing this weekend. If you do, you'll find that exits are fun.
Approaching exits.
Speed exits are not only for speed stars. Why?
Think of exit as psychological preparation for the rest of your skydive.
Fast exits make everyone's freefall time easier and more productive. Because of the very nature of a hot exit, it sets the tone and pace of the rest of the skydive.
If you have to wait to get out the door, you'll probably have to wait for your turn to execute your slot.
Exploding out the door forces your concentration, tunes your awareness to your next move. The speed of the exit is carried over to the rest of the skydive: a fast pin/base only follows an explosive exit.
Ultimately, the pin/base and the rest of the skydive become part of the exit.
Four things make good, fast exits:
1 - Low Volume
2 - Common Motion/Momentum
3 - Presentation to
Air/Relative Wind
4 -Comfort & Safety
1) Low Volume. It's important to get the last man in line (or on the step) as close as possible to the first man out the door.
Inches in the airplane factor into yards in the propblast. `Me factor varies according to the design of the door through which the exit must pass. Every door/floor/fuselage/airspeed combination is unique in how it spreads skydivers across the sky. Small-door Beeches have a high factor; Cessnas and Skyvans have a low factor.
Pay attention to aircraft. Every plane has a different potential. Beechcraft exits waste the space a DC-3 or Lodestar offers. A 182 exit doesn't work as well if you're jumping a 180 or a 206. Fit the exit to the airplane.
To get low volume: A. Determine your door picture. How wide and how high is the open space in front of you? There are two approaches to this.
An angled exit permits a longer, smoother flow but narrows the door picture. A straight, perpendicular line uses the maximum door width but limits the number of people in the line.
Similarly, a tall, standing line-up uses the full height of the door, but forces the people in front to perform long turns as they enter the prop-blast.
Either approach can work well. Choose one according to the skydive that's planned.
B. Have everyone present themselves to the door, then present themselves to the man in front of them. Allow no space.
Don't crouch and shove your butt out (moving the man behind you further back). Keep your trunk vertical, squat and slide under and against the man in front of you, press your legs and belly against his pack.
Space is distance and distance is time. Time is what makes a slow exit. Allow no space.
C. Compress your line physically. Hold on to something in front of you and push/pull yourself to it. As the entire line does this (all the way back to the 22nd diver) it'll shrink 15% - and the last man will be closer to the first man. And get to his slot sooner.
D. Hang people outside of the airplane. Practice low volume with each person wearing what they wear jumping (and cinched down tightly). Five minutes doing this before your skydive will be worth it. Honest.
2) Common Motion/Momentum. There's no point in leaving the plane right next to someone if that someone is going away from you.
Plan the exit (particularly the front pack) so it is flung away from the plane like a handful of marbles. Everybody leaps into the airstream individually together.
It's something we learn, unconsciously, from Cessna struts, then somehow forget when we try on different airplanes.
If the man in front of you dives down while you jump up, you're already going away from one another. If you both hop out (or off) in the same direction, your momentum is the same - and it takes just small flying forces to bring yourselves together.
Compare it to orbital spacecraft docks. When they're already in the same orbit (momentum), satellites use teeny thrusters to dock. But massive boosters are required to get separate spacecraft into the same momentum.
If you exit with common motion/momentum, you leave the airplane on final approach to your slot.
To get there, you need:
Good count. A simultaneous, controlled count. Tradition has it that 3, 2, 1, GO works best. Assign certain people their counts and motions according to their position in the exit. (Sometimes if the front initiates their motion between 1 and GO, the exit flows faster with less resistance. Late divers need not count, just react to the pack in front of them. Floaters need to be told when "GO" happens.)
Good picture. Plan ahead how to share the door picture. Find out where the man in front of you plans to pass through the door, then plan to take some other part of the door (if it's big enough). If you plan how to alternate and share portions of the fuselage and door, you'll reduce bumps and friction, and exit faster.
Good push. Join your exit force with the common exit force. The direction and flow should be in a line as straight as possible out the door. Curves and angles squeeze people out of line and should be reduced or eliminated where possible. Don't push anyone anywhere but through the door. Always move for the door.
Good grips. Grips help exits. Flying something off the step or out the door is exciting and challenging and gets your skydiving/flying started faster. Grips are your sensors that tell you the direction of the momentum of the exit in front of you. The better you get at it, the less tugging/friction/resistance the exit gives you and, eventually, you're not hanging on - you're just there. With your hands on the exit to prove it!
3) Presentation to the Relative Wind. The exit must give every member control (leverage, either aluminum or relative wind) to, through and outside the door.
Sometimes it's not easy. There's a stiff, sudden, horizontal wind outside the airplane. Don't be surprised by it.
Think about how your exit will introduce your body to the slipstream. Where is your body while you're still inside or on the fuselage? Where is your head? Where are your eyes looking? And where is your slot?
Get on the optimum relative wind for your slot immediately. Imagine your slot and the very best body position you'll need for a clean swoop to it. Then, jump from your airplane exit position to that swoop body position in the airstream.
It's important to use the airplane's slipstream and take advantage of the most wind (control) just when you need it. You'll be through the slipstream before you have time to react to it, so plan how you're going to meet it (your presentation) before you leave the plane.
Fast, good exits get everyone flying on the same air sooner. By reducing the differences in exit members' relative winds, fast exits reduce variables and confusion. The faster the exit, the sooner things happen.
4) Comfort and Safety. Skydiving is more fun when we don't get hurt and it's easier and safer for us when we don't abuse our gear. Exit has to achieve the first three factors and still maintain comfort and safety.
Low volume isn't meant to injure people or damage gear; good push isn't good push if it opens containers or canopy releases. There are ways of getting out of an airplane without sacrificing our bodies.
How? If you pay attention to the first factors: low volume, good motion and your presentation to the relative wind, and invest a short time working them out, they provide comfort and safety in themselves.
Look for the sloppy, loose areas in the lineup that will (I promise they will!) bump around and expand and rub and make your line-up stop and start and hurt someone. Eliminate those spaces, then you have good low volume.
Look for each member's presentation to the air. If he has it, he has control. If he doesn't have it, he's out of control - and that's when we get hurt. Good presentation is comfortable and safe.
Look for everyone's motion to take them out the door' Get a good door picture, get everybody moving for the door. Together. Good motion means no one is aimed for the door jam, means there are no bumps and grinds to interrupt your skydive.
Look for the hooks and snags that will (even if they never have before) snag, tear or rip something or someone. Look over the airplane and yourselves. Look to see that you'll make it out of the plane in one piece.
Fix it, tape it, hammer it down or take it off, make it right before you get in the plane. There's no point in letting some silly oversight interrupt someone's skydive.
And that's the point: your skydive begins when you tighten your leg straps, and it ends when you close your container. Don't allow any interruptions.
Approach your skydive as a whole thing, so you can enjoy the whole thing.
Kevin Shea, Parachutist. April 1977
Captain Hook (Al Krueger) of "Captain Hook & the Sky Pirates" has this exit hint; "Never touch the door sill or frame with your hands on exit. It will slow you down."
RWu, June 1974